Here we go again. It feels like the WooCommerce plugin has become the same as some of those free extensions you get from the repo that fill up the WordPress dashboard with ads, notices and banners.
This time around, let’s get rid of the “Print discounted shipping labels with a click. By clicking “Create shipping label”, WooCommerce Shipping will be installed and you agree to its Terms of Service. Create shipping label” banner that displays at the top (!) of the single order admin page when the status is processing or completed and shipping is required (see screenshot below).
Whether you’re dealing with bulky items, fragile goods, or specific shipping items, you can leverage WooCommerce’s flexibility and implement a fee structure that accurately reflects shipping complexities, improves profit margins, and enhances overall order management.
This tutorial gives you a practical solution – dynamically adding checkout fees based on whether a given shipping class is in the cart.
WooCommerce offers a robust shipping system, but what if you want to tailor it based on the logged in user role?
In this blog post, we’ll show you how to exclude specific shipping methods from users with a particular role. This allows you to, for example, offer free shipping only to VIP members or restrict express delivery options to regular customers.
All you need is the user role slug (WordPress Dashboard > Users -> All Users > above the user list table you’ll see a horizontal list displaying the current user roles available on your site (e.g., Administrator, Editor, Author). Hover on one of them and see the URL, which will contain the exact slug e.g. “customer”) and the shipping rate ID you wish to disable (e.g. “flat_rate:9”. For more info you can find out how to find IDs here: https://businessbloomer.com/woocommerce-disable-free-shipping-if-cart-has-shipping-class).
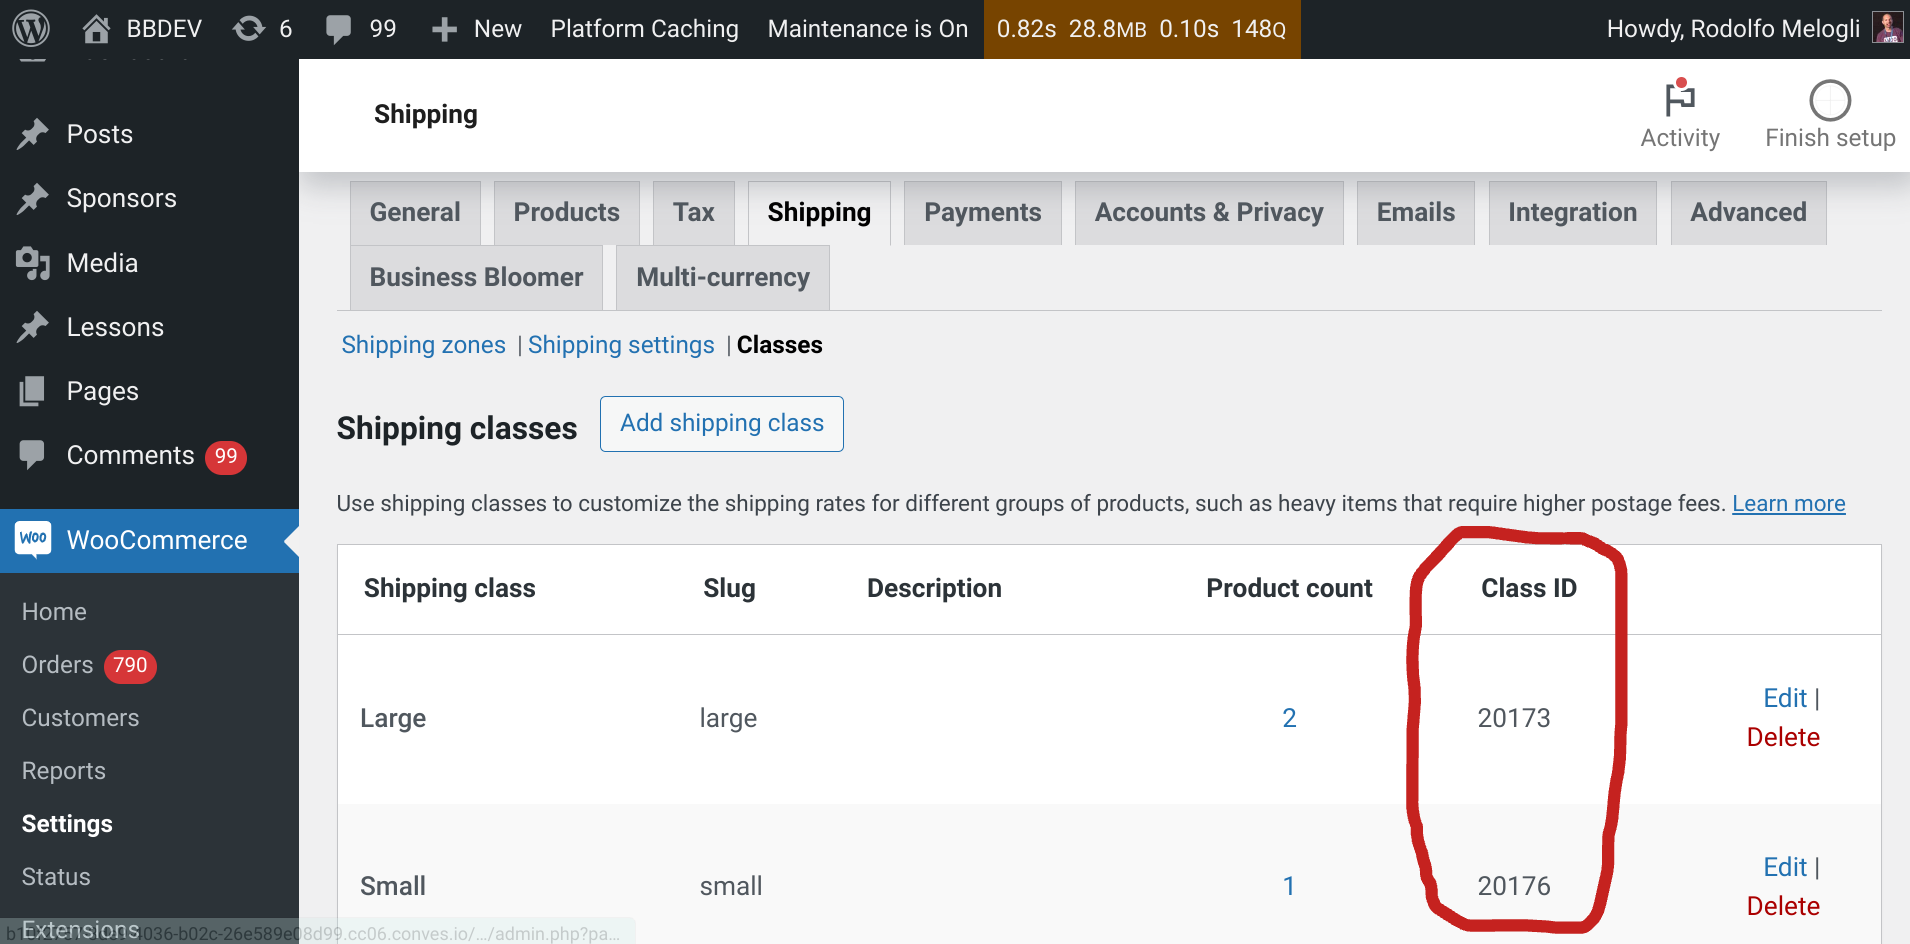
You can use WooCommerce shipping classes to customize shipping rates for a defined group of products. You can manually add shipping classes via the /wp-admin/admin.php?page=wc-settings&tab=shipping§ion=classes URL (i.e. WooCommerce > Settings > Shipping > Shipping Classes).
We’ve often worked with snippets requiring a shipping class ID, and I explained there were a couple of ways to figure that out, all involving the “Inspect” tool of the browser.
But what if you need to actually display the IDs inside the shipping class table, so that it’s easier for the store admin to get and use such data?
Well, the snippet below will help you do that. And thanks to Peter for sharing most of the code!
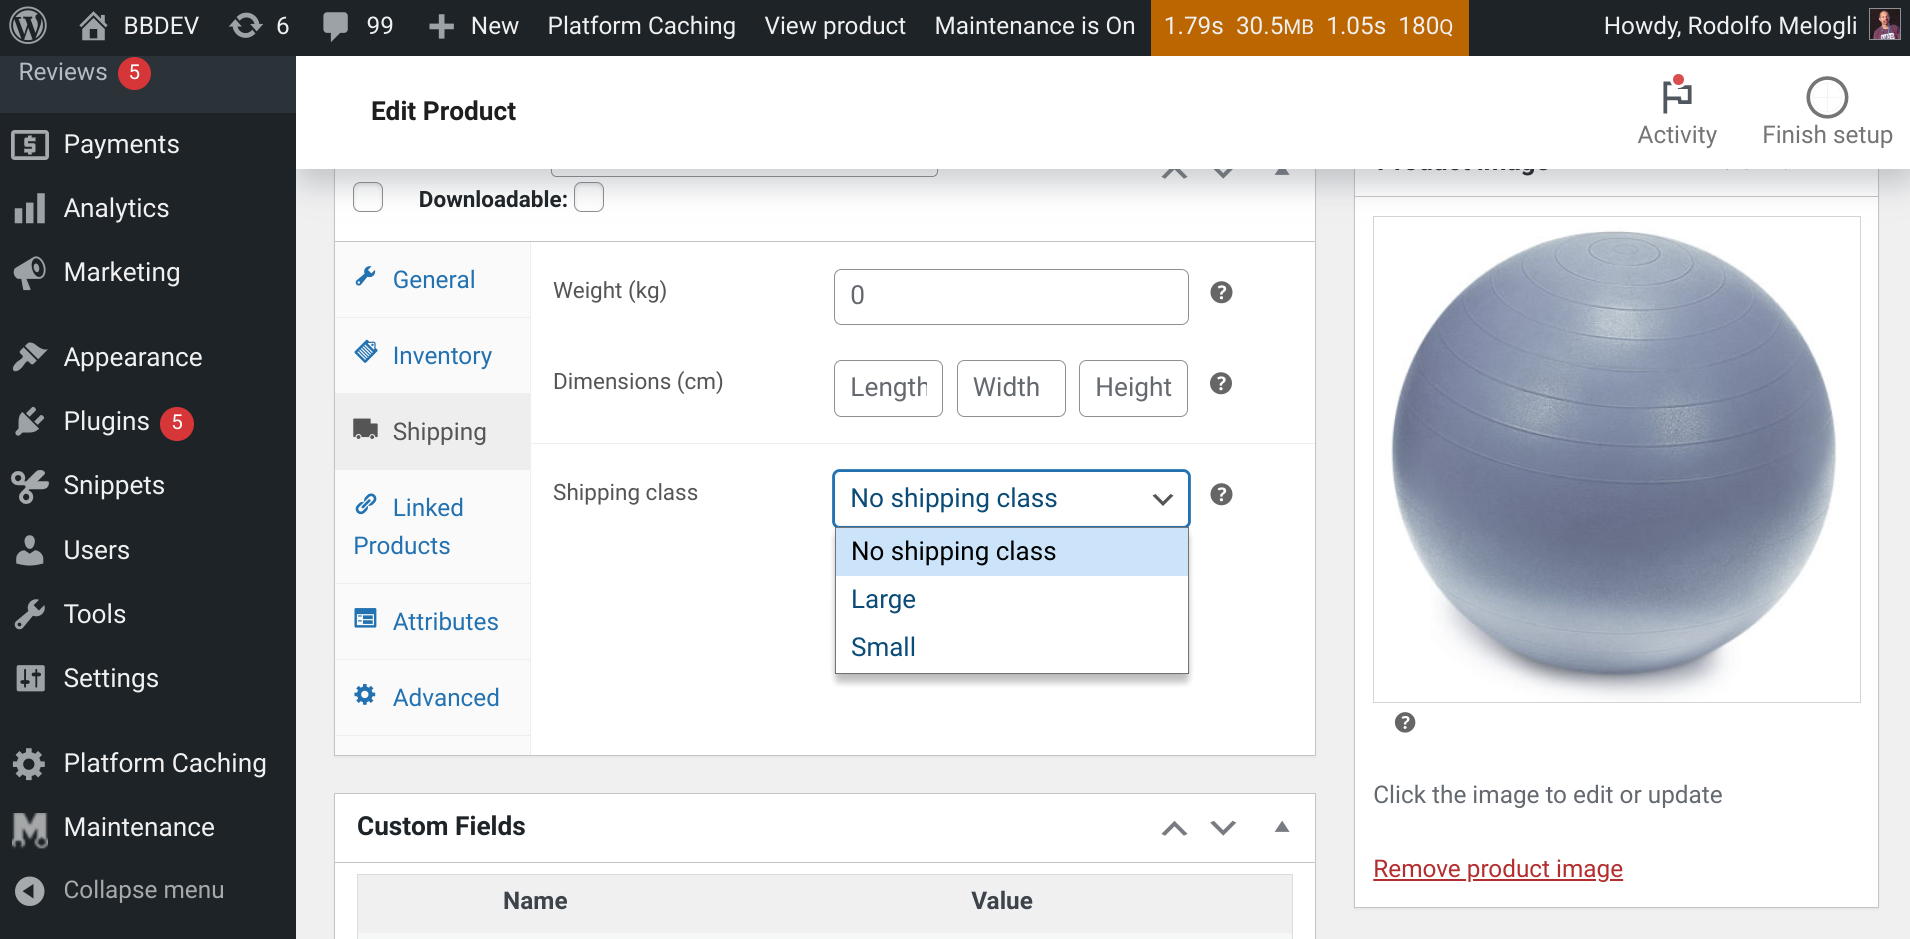
Manually assigning a shipping class to each product can be tedious and time-consuming. Here’s where default product shipping classes come to the rescue!
This code tutorial will show you how to set a default shipping class for your products in WooCommerce without the need to access the “edit product” WordPress admin page to pick an option from the shipping class dropdown.
You don’t feel confident with coding? You don’t want to purchase yet another bloated, expensive plugin? Great!
Business Bloomer WooCommerce Shipping by Weight Mini-Plugin comes without the usual WordPress plugin hassles. One feature. Lifetime license. No annoying subscriptions. 1 plugin file. A few lines of code. No banners. No up-sells. No WordPress notifications. Use it on as many websites as you like. Lifetime support. 1-page documentation. Super simple settings.
Speaking of which, here are the settings:
As you can see the plugin is straight forward. Install it, set up weight restrictions for each/all shipping methods, and conditionally show shipping rates based on the total cart weight. Simple!
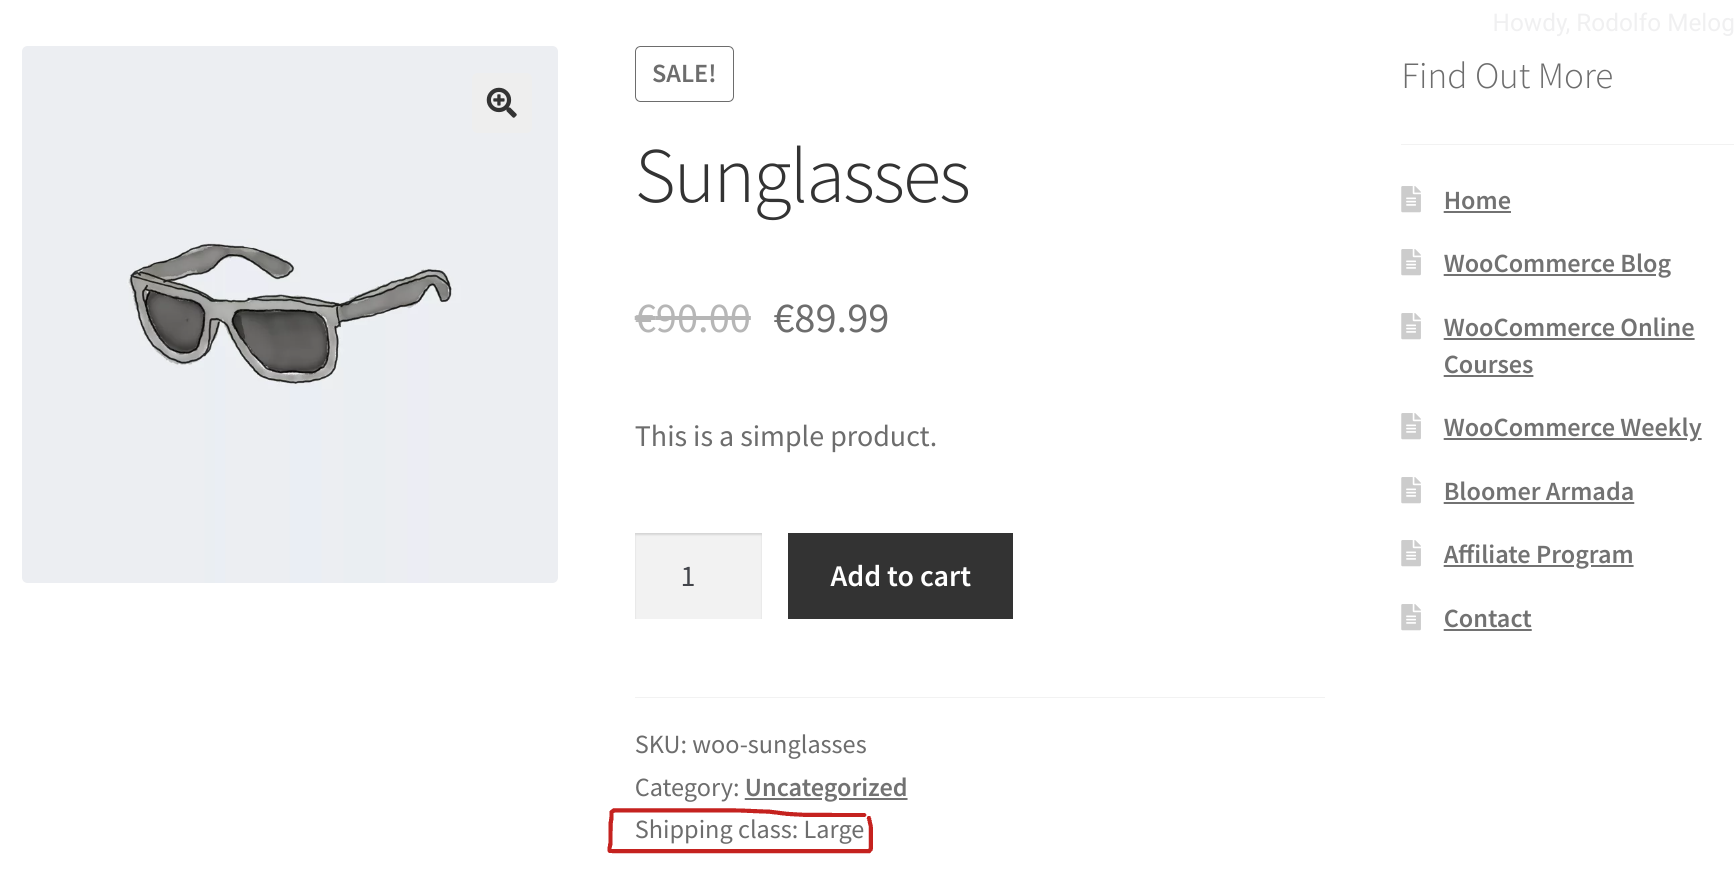
In certain cases, you may want to show the name of the current product’s shipping class. This is helpful especially for B2B stores, or when the shipping class name is very descriptive and helps the customer with their shopping choices.
Of all the places where we can print the shipping class, I chose the “Product Meta” section, which already shows the product SKU, Tags and Categories – this code will add another line called “Shipping class”, together with the name of the class (if any, of course). Enjoy!
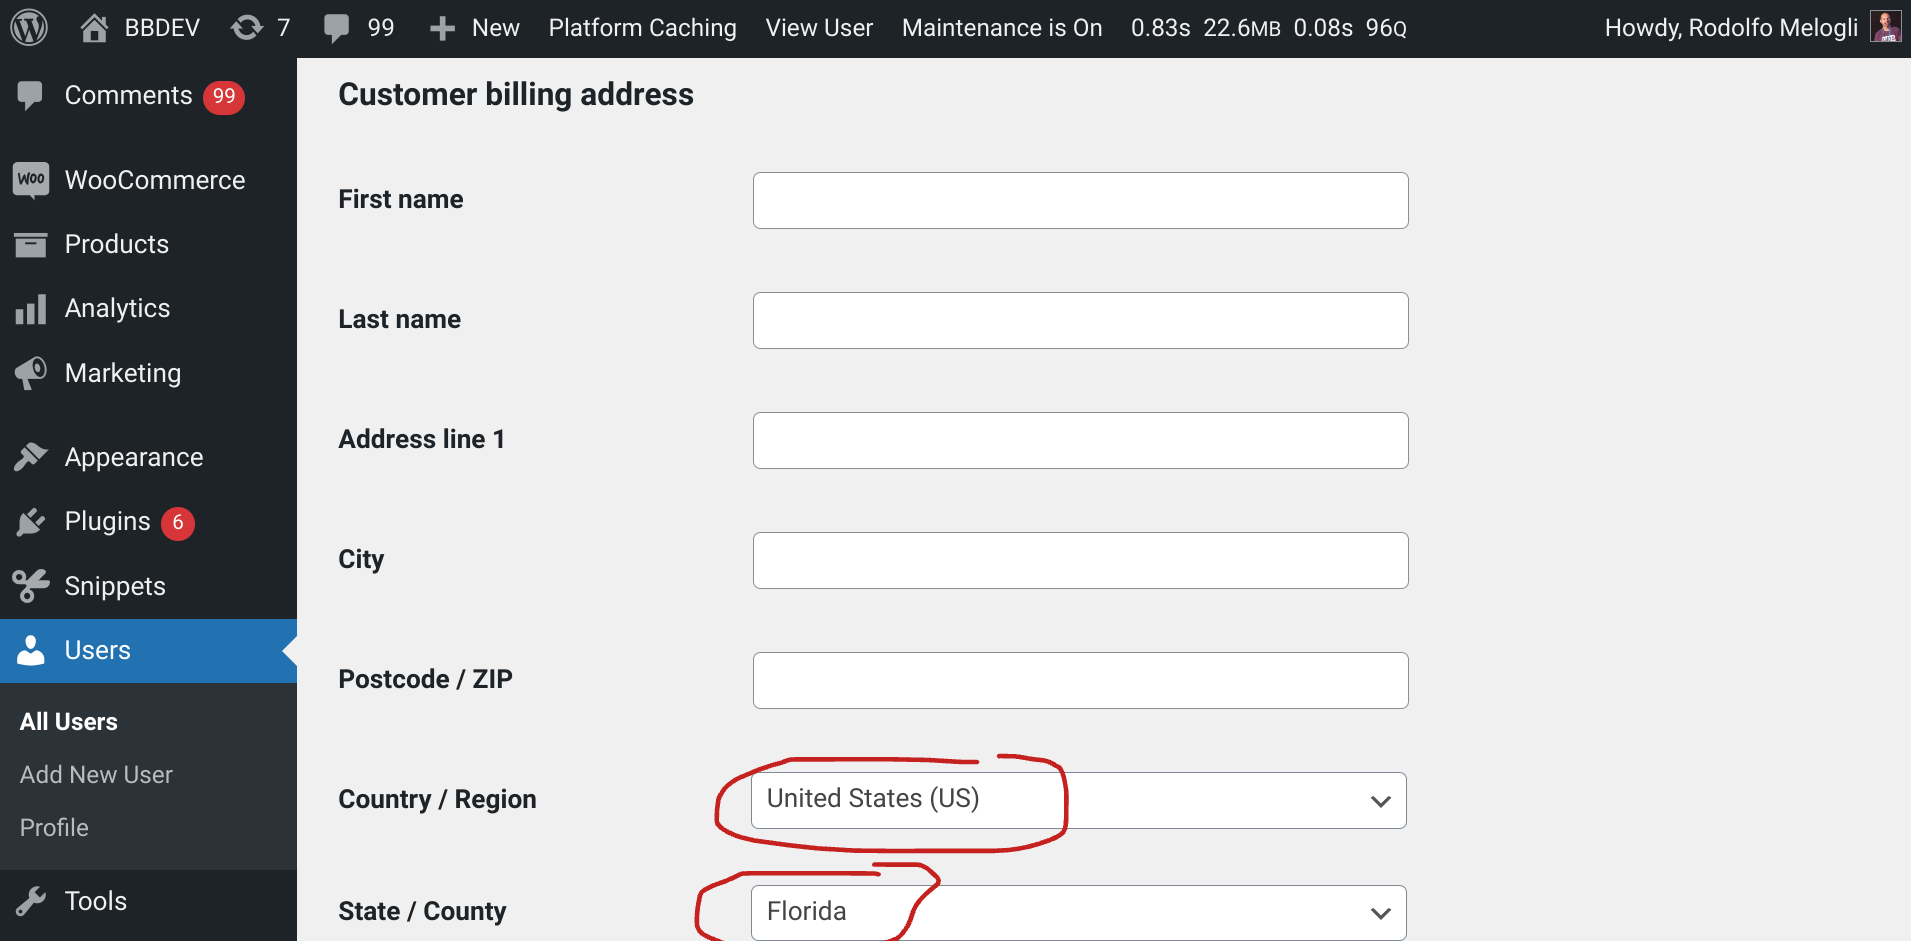
If you do a lot of manual work such as creating WordPress users for a B2B WooCommerce site (because they can only shop if they have an account, and you’ve disabled registration on the frontend), you may want to populate some Billing and Shipping fields so that you can save some time.
For example, imagine if all customers are based in Florida, USA; you could automatically populate their billing country, billing state, shipping country and shipping state!
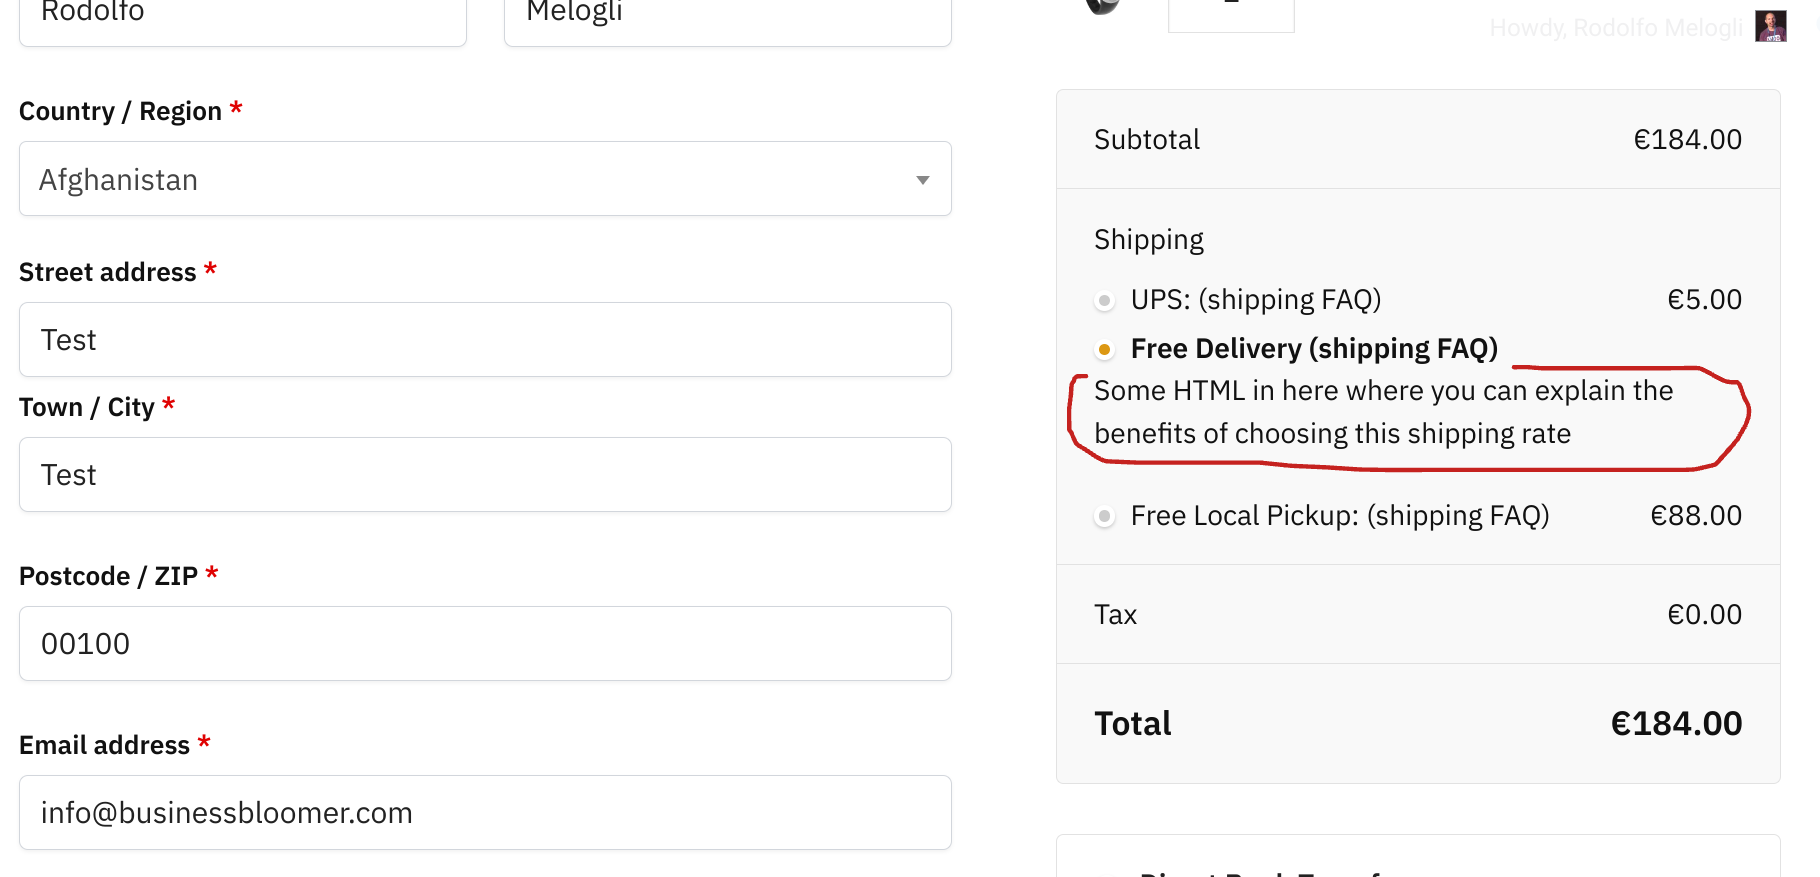
Each payment method on the WooCommerce Checkout page comes with a description right below the label. What if we could achieve something similar for the shipping rates, so that we can explain to the customer the difference between each method?
This question came up today in our private Slack channel for Woo developers, and we were able to write a quick snippet that does the trick. Here’s the complete code – enjoy!
Well, we can do the exact same with the shipping methods!
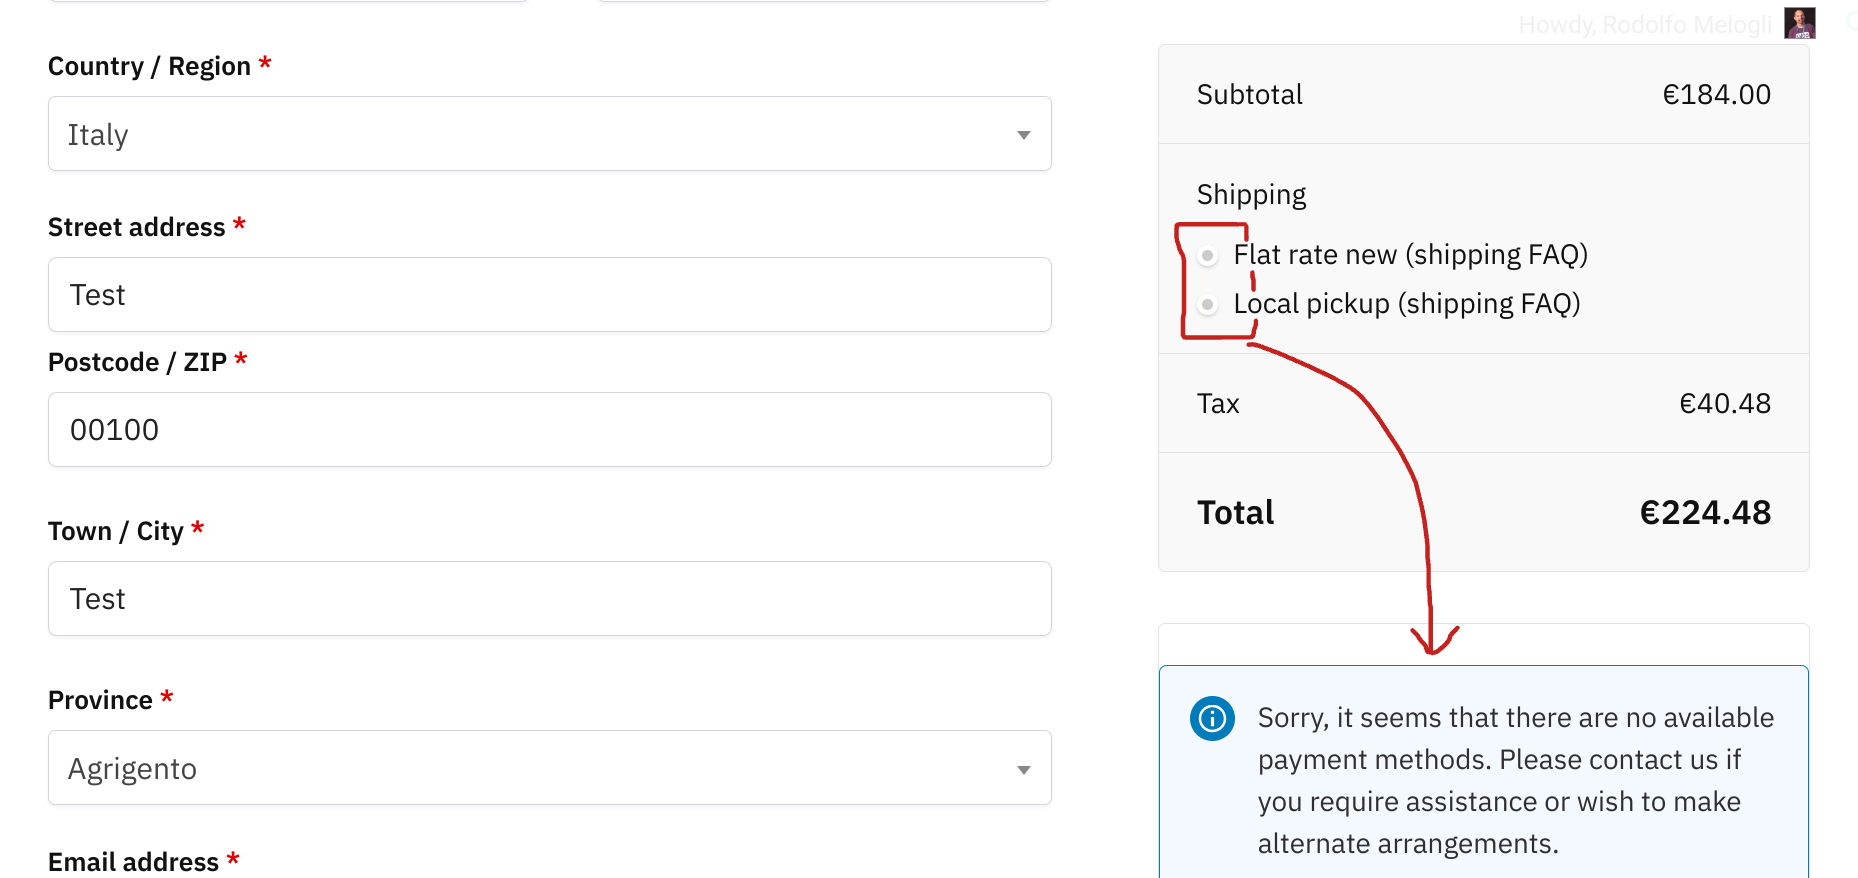
In this way, customers will be forced to actually click on one of the shipping options. This is helpful when you don’t want to have a default shipping, and when your customers often “forget” to pick the correct one and ask to change it once the order has been placed.
In WooCommerce you have publicly accessible product archives for product categories e.g. “all tables“, product tags e.g. “all casual” and product attributes e.g. “all medium“. URLs are available to you and you can even define their custom permalink slug base via the settings e.g. /product-tag/, /product-cat/, etc.
What’s interesting though, is that there are many more “custom taxonomies” that are registered in WooCommerce, however they don’t seem to have their own archive, because it’s been decided they were not useful.
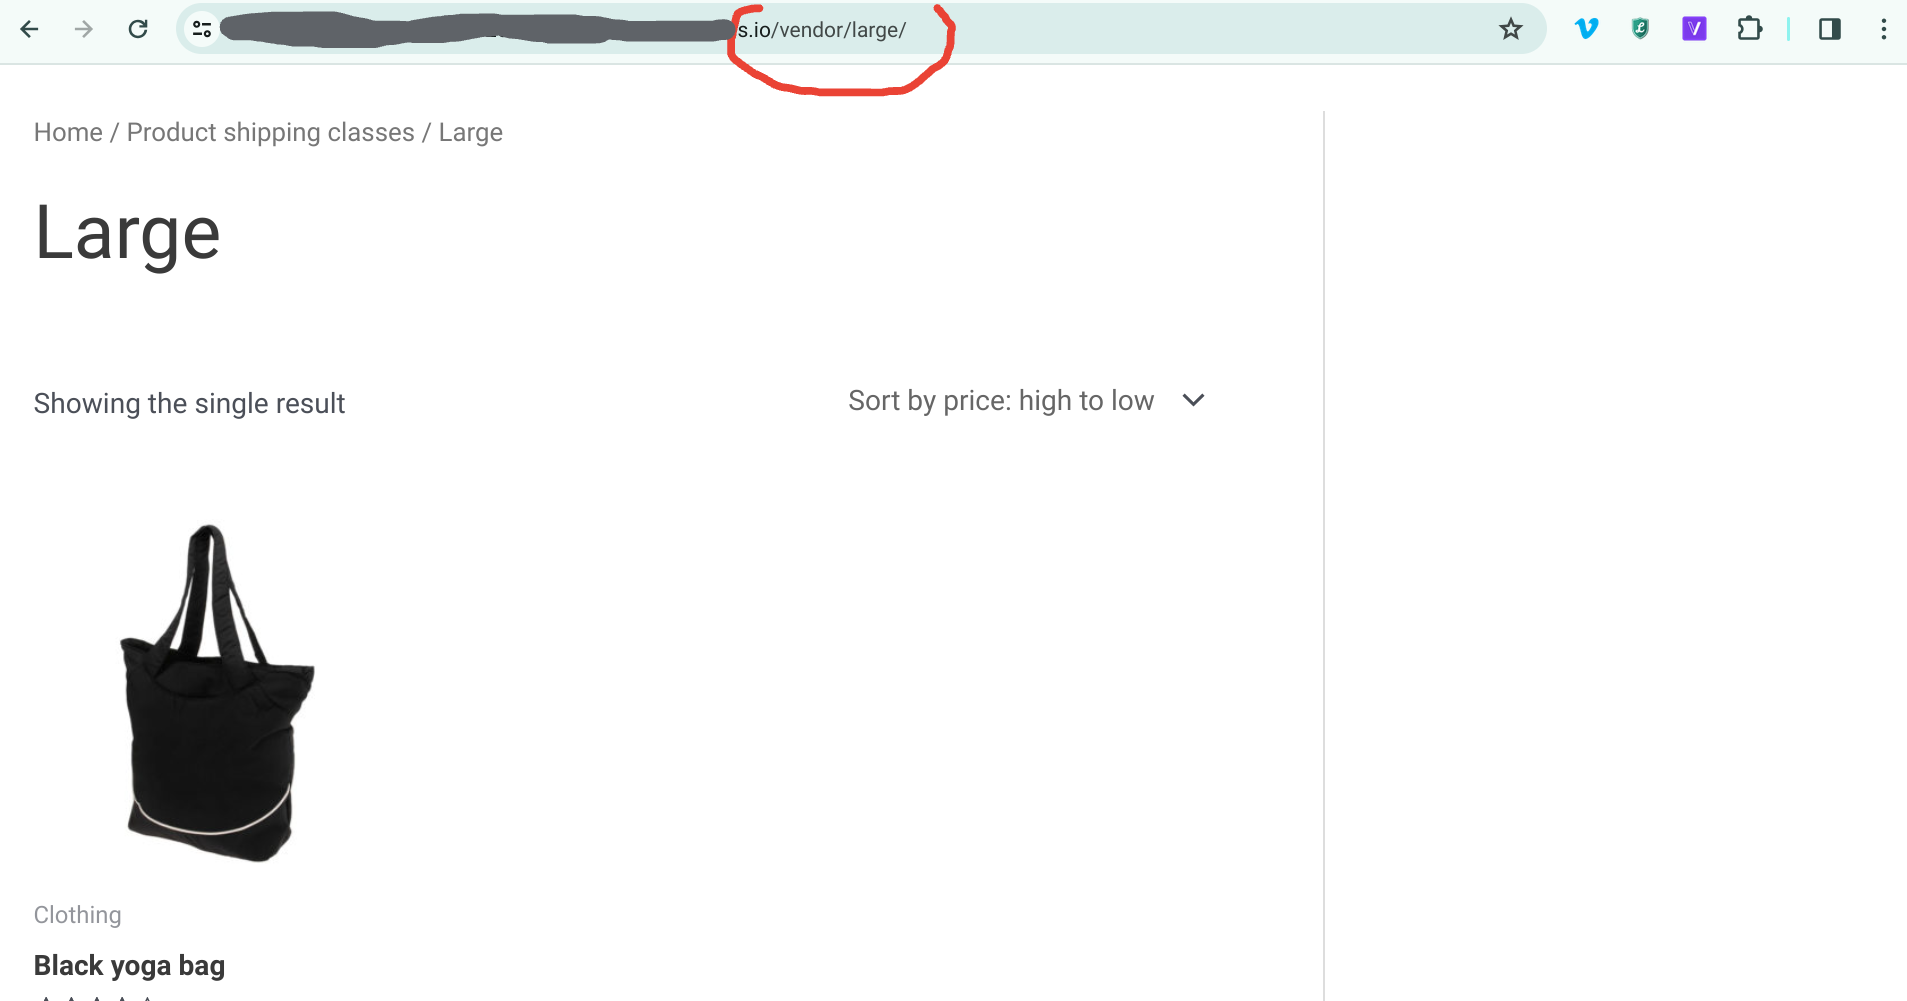
But what if you want to see, as a customer, all the shop products belonging to a specific shipping class? We’ve seen, for example, how to split the cart into packages based on shipping class – so it would be super helpful to customers, in such a case, to view all the products belonging to each shipping class at a given URL.
I’m using the funnel kits plugin for the checkout page. I have tried different logics but none of them seem to work. We have 4 different shipping options.
Free shipping
Local Pickup
Standard Shipping
Express Shipping
The local pickup option is the first one that’s showing on the shipping options on checkout. I would like to make it the last option. People get confused thinking it’s a free option. So I would like to have it in the following order.
Free Shipping
Standard Shipping
Express Shipping
Local Pickup
All I would like to do is move the local pickup option to the last. Please help.
Let’s say you want to help customers understand your shipping rates and benefits right on the WooCommerce Cart and Checkout pages, by adding a link to each shipping option (e.g. “View shipping FAQ“).
As you can see from the first and second screenshot below, if you enter any HTML within the WooCommerce shipping zone -> shipping method settings, this will be stripped out, and HTML tags such as hyperlinks won’t work.
So, how can we add a clickable text link to each shipping method, given that we can’t use the WooCommerce settings? Well, as usual, a quick PHP snippet can help us with that. Enjoy!
Navigating the landscape of WooCommerce can be made significantly easier with a dropshipping agent, especially when sourcing products from China.
A dropshipping agent operates as the vital linkage in your business chain. Essentially, they manage transactions between you and your supplier. Their duties range from handling product sourcing to managing stock and ensuring quality control.
For instance, if we consider the product purchasing process, your agent would tackle this task on your behalf. They work directly with suppliers, negotiating prices and paving the way for smooth business operations.
Especially when you do a lot of custom shipping, showing the shipping method title may not be a good idea. Honestly, the default “via ___” suffix beside the shipping cost doesn’t make much sense anyway.
Even when the “shipping calculator” is disabled on the WooCommerce Cart page, a “Shipping to…” string will appear in the cart totals if an address has been previously entered or if geolocation is enabled.
Most WooCommerce store owners, however, wish to remove / hide this text, as it can be confusing for the customer. In this quick tutorial, we’ll study two different workarounds to achieve the same result. Enjoy!
There are times when the WooCommerce countries database is simply not enough. While the WooCommerce team is usually very fast at updating its code (though, the newest country is apparently South Sudan, which became independent in 2011, the year WooCommerce launched!), you may need to DIY in certain cases.
Think of Northern Ireland for example. It’s not a “country”, however most Irish businesses would ship to Northern Ireland and not to “UK”, so having “Northern Ireland” in the Checkout page country dropdowns may help.
In this edge case study, we’ll basically take a look at how to add a custom country, how to make sure this custom country shows at checkout as a possible option (and in the shipping zones admin section), and also how to assign to it a custom list of states. You never know!
WooCommerce inbuilt shipping settings are quite simple – too simple, sometimes.
WooCommerce merchant often require a complex shipping setup, depending on the industry or the (very expensive) courier fees.
But shipping is much more: conditional logic, marketing, user experience.
Setting shipping costs with a handy “table rate” plugin, combining them with cart-based marketing actions and guiding your customers through the buying process can help you sell more and reduce your return rate.
Explaining to your customers why they can’t buy a certain product, or encouraging them to add another one to the cart to get a discount, or blocking certain shipping rates so that your courier doesn’t overcharge you… there are so many needs for a more advanced shipping setup.
In this article, we’ll tale a look at the importance of shipping costs, why conditional logic is a game changer and why customers love to get free shipping. Enjoy!
This time we go study how to “get” the shipping zones and rates, because it’s likely that you will need to loop through them when you need to display shipping rates somewhere, or for other custom functionalities. Enjoy!
You don’t feel confident with coding? You need more control over your payment/shipping exclusions? You don’t want to purchase yet another bloated, expensive plugin? Great!
Business Bloomer WooCommerce Toggle Payments By Shipping is a mini WooCommerce plugin, without the usual hassles. One feature. Lifetime license. No annoying subscriptions. 1 plugin file. A few lines of code. No banners. No up-sells. No WP notifications. Use it on as many websites as you like. Lifetime support. 1-page documentation. A single and easy admin dashboard.
Screenshot of the settings:
Quick demo:
As you can see the settings are pretty straight forward. Select a payment method you wish to hide/show from the left, and the shipping method that should trigger that from the right. Add more rules if needed. Simple!