WooCommerce: Custom “Empty Cart” Button

A dedicated “Empty Cart” button can significantly streamline the customer journey on your WooCommerce website.

Yes, you can manually change the product quantities to 0 on the cart page, or click on the “remove item” icon for each product… but having a button that can do all that could be a time saver, especially for B2B WooCommerce customers.

This post will guide you through creating a custom empty cart button. We’ll cover a code-based solution that uses jQuery to listen to button clicks and Ajax to trigger the empty cart function.

Enjoy!

Continue reading WooCommerce: Custom “Empty Cart” Button

WooCommerce Visual Hook Guide: Cart Page (Block Version)

I’ve put together a visual hook guide for the WooCommerce Cart Block (you can find the legacy shortcode version here).

Please note – as of the date above, you can’t really customize the Cart Block via PHP (unless you use the workaround below).

If you need to personalize the Cart page, move elements around, hide default elements, add custom content, you can play on the Edit Page and do the usual manual work with blocks: you can move them (e.g. you can move the coupon form to the bottom), remove them (e.g. you can remove the cross-sells block), place blocks in between default blocks (e.g. you can add some text above and below the “Place Order” button), etc.

But if you wish to do that via code (custom plugin, snippet, child theme), then you must revert to the shortcode version – unless, once again, you get to understand my workaround as per the below visual hook guide.

So, at least for now and until WooCommerce decides to release actions and filters for us developers, let’s see how to find WooCommerce Cart Block hooks quickly and easily by seeing their actual location.

Once you’ve picked your hook, all you need to do in your custom code is “add_action(‘hook_name’,’custom_function’);” and you can place your personalized content in that exact position within the WooCommerce Cart Block.

Enjoy!

Continue reading WooCommerce Visual Hook Guide: Cart Page (Block Version)

WooCommerce: Remove Second Item When Item Removed From Cart

This approach might be relevant for specific promotional offers (e.g. BOGO) or custom coded product bundles. In this case, you may want to remove a second item from the cart – programmatically – once a product is removed.

Of course, a relationship is needed between the two cart items via custom cart item meta data (for example, the “bundled” item will need to specify the ID of the “base” product in the cart within some custom cart item meta, so that we can “listen” to its removal).

Alternatively, you can check if a pair of product IDs are in the cart, and if one of them is removed, we’ll automatically remove the other – this is the case study we’ll go through today as it’s much easier.

Enjoy!

Continue reading WooCommerce: Remove Second Item When Item Removed From Cart

WooCommerce: Empty Cart Redirect

An empty WooCommerce Cart page can be frustrating for customers, especially if they’ve been browsing and adding items to their cart.

Redirecting them to a relevant page, like the Shop page, can help them continue shopping and potentially complete a purchase.

The redirect page can be used to showcase ongoing sales, promotions, or new products that customers might be interested in. This can help generate interest and encourage customers to make a purchase.

So, let’s see how we can redirect users from the empty Cart page to another page on the same website. Enjoy!

Continue reading WooCommerce: Empty Cart Redirect

WooCommerce: Add Shipping Rate Description @ Cart & Checkout Page

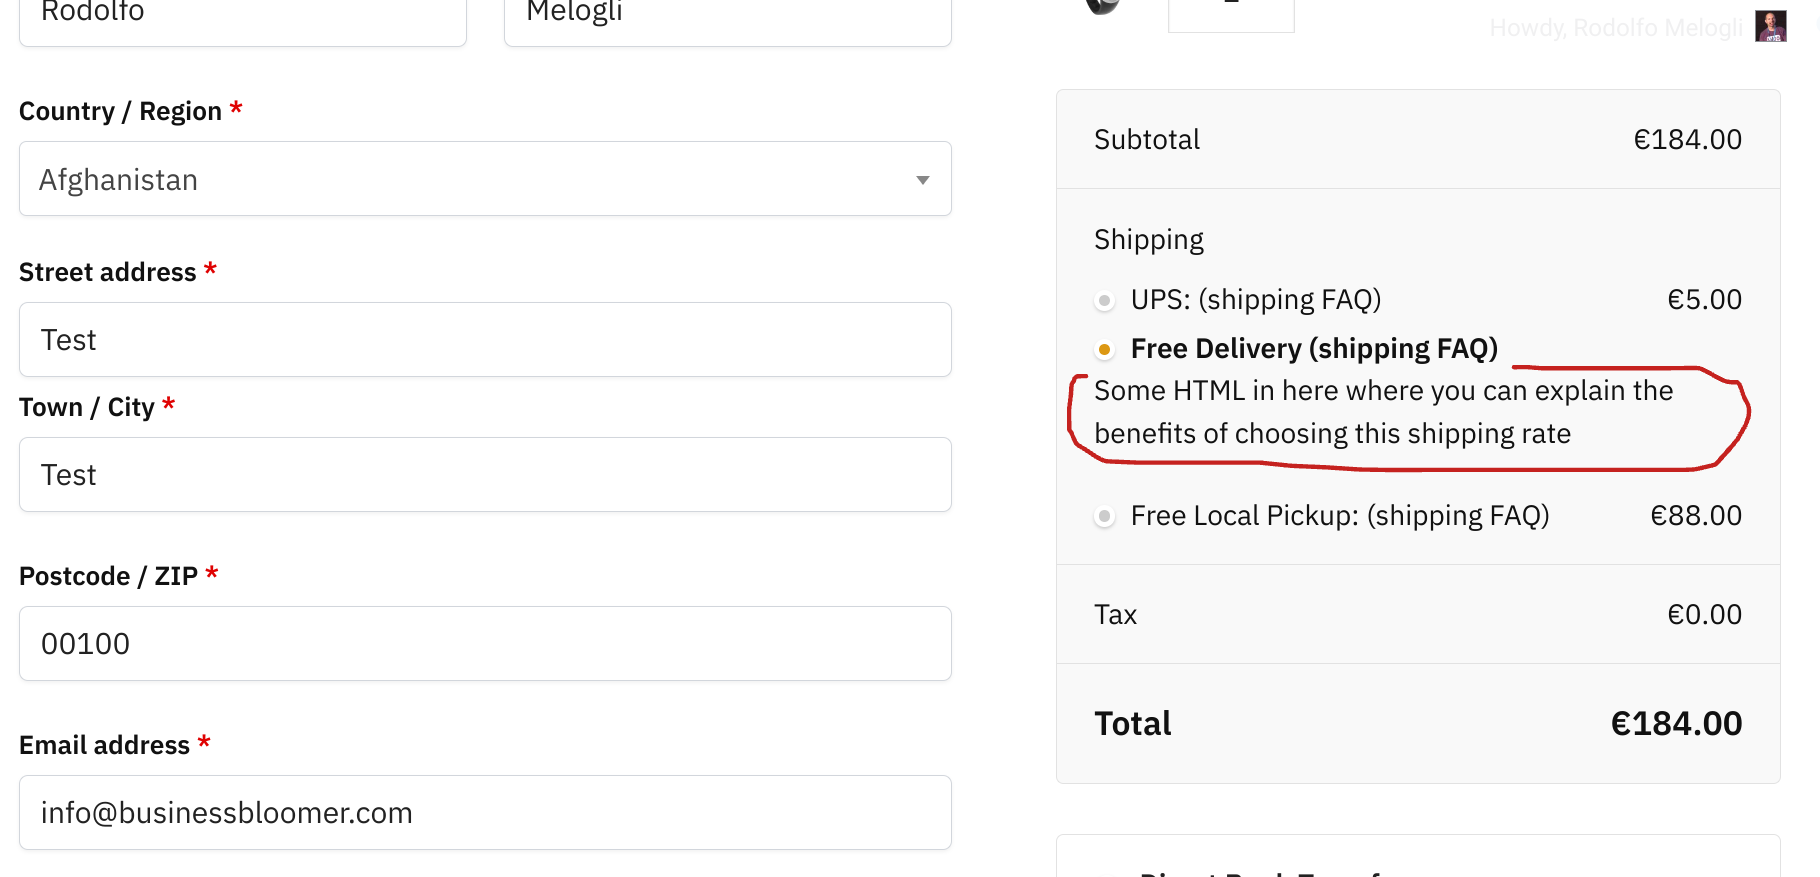
Each payment method on the WooCommerce Checkout page comes with a description right below the label. What if we could achieve something similar for the shipping rates, so that we can explain to the customer the difference between each method?

This question came up today in our private Slack channel for Woo developers, and we were able to write a quick snippet that does the trick. Here’s the complete code – enjoy!

Continue reading WooCommerce: Add Shipping Rate Description @ Cart & Checkout Page

WooCommerce: Split Cart Into Packages

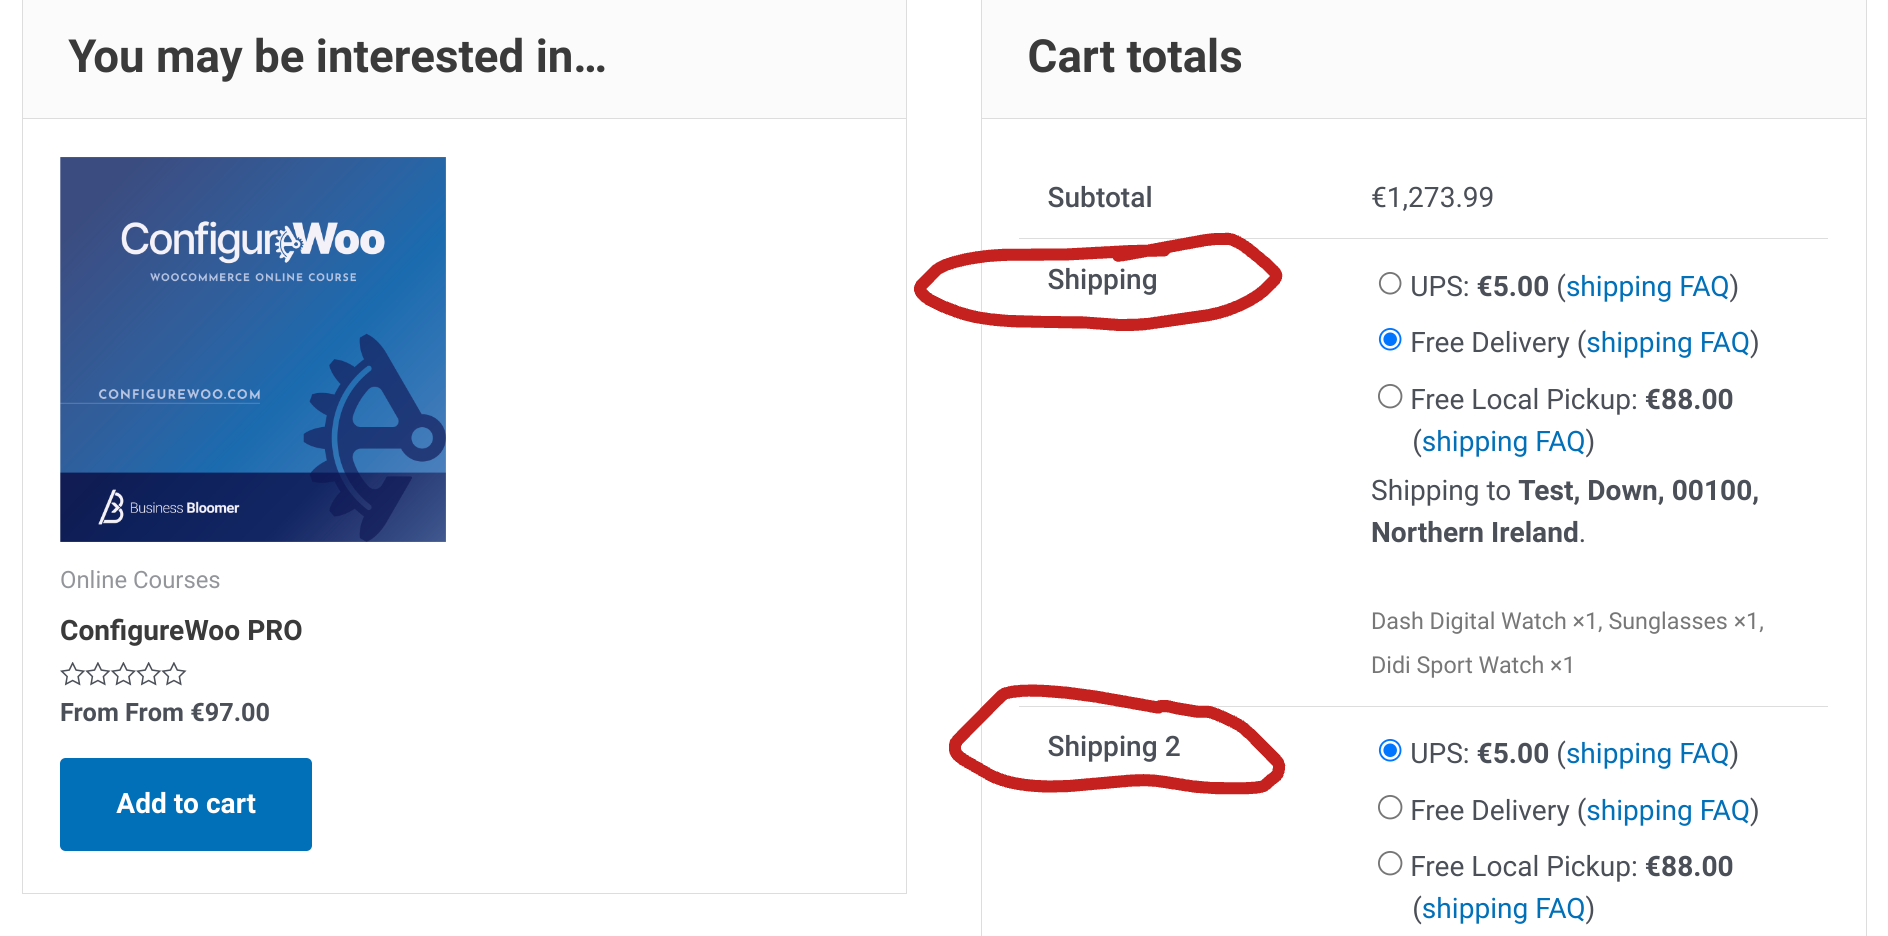
There are a million plugins out there that allow you to make the most of WooCommerce “cart packages” – this is a short way to say that you have the chance to assign cart items to multiple “packages“, so that the customer can pick different shipping methods for each package.

For example, imagine you sell products that are only available for “pick up in store“, and others that are shippable. By splitting the cart into 2 packages, the customer can place both product types in the same cart, but will be able to choose “Local pickup” for package 1 only, while for package 2 they’ll select one of the available delivery rates.

Splitting the cart into multiple packages is as easy as looping through the cart items, and assigning them to its own package array based on shipping class. Enjoy!

Continue reading WooCommerce: Split Cart Into Packages

WooCommerce: Add Hyperlink to Shipping Method Label @ Cart & Checkout

Let’s say you want to help customers understand your shipping rates and benefits right on the WooCommerce Cart and Checkout pages, by adding a link to each shipping option (e.g. “View shipping FAQ“).

As you can see from the first and second screenshot below, if you enter any HTML within the WooCommerce shipping zone -> shipping method settings, this will be stripped out, and HTML tags such as hyperlinks won’t work.

So, how can we add a clickable text link to each shipping method, given that we can’t use the WooCommerce settings? Well, as usual, a quick PHP snippet can help us with that. Enjoy!

Continue reading WooCommerce: Add Hyperlink to Shipping Method Label @ Cart & Checkout

WooCommerce: Apply Discount to Cheapest Cart Item

If you run WooCommerce store promotions, this little snippet will help you with that. For example, how to run a “Buy 2 products, get one half off” or a “Buy 3 products, get the cheapest one for free” campaign?

The trick behind this workaround is to find the cheapest item by looping through the cart, and then to set its price so that it’s lower than the regular price. Enjoy!

Continue reading WooCommerce: Apply Discount to Cheapest Cart Item

WooCommerce Dynamic Pricing: BOGO, Buy X Get Y & Conditional Discounts

Offering promotions is a great way to attract customers and increase sales in your online store. Some promotion strategies that have proven effective are the Buy One Get One Free (BOGO), Buy X Get Y, and WooCommerce dynamic pricing.

Taking this into account, you may want to offer reduced prices to your users in these various circumstances:

  • Run a flash sale for a limited time.
  • Encourage your customers to buy specific products in a clearance sale.
  • Offer product bundles to big spenders.
  • Add free shipping when someone makes a bulk purchase.
  • Automatically add gift items as part of your store’s loyalty program.

Without dedicated plugins, these strategies might be utterly difficult to conduct. To save yourself from the coding hassle, you should pick a WooCommerce dynamic pricing plugin to quickly get it up and running.

In this blog post, we will discuss how to create a BOGO promotion, Buy X Get Y, and dynamic pricing rules in WooCommerce based on user conditions. And it requires no coding knowledge. Let’s dive in.

Continue reading WooCommerce Dynamic Pricing: BOGO, Buy X Get Y & Conditional Discounts

WooCommerce: Hide “View Cart” Button @ Mini-Cart

Your goal as a WooCommerce entrepreneur is… to get paid!

We’ve already seen how to put Cart and Checkout on the same page to save your customers a step and go straight to the purchase page – but no matter if you still have a Cart page or not, you may be interested in hiding the “View Cart” button from the cart widget dropdown, so that customers can go straight to the Checkout page and convert.

Here’s a super quick snippet to achieve just that. Enjoy!

Continue reading WooCommerce: Hide “View Cart” Button @ Mini-Cart

WooCommerce Subscriptions: Display Start-End Dates @ Cart & Checkout

Interestingly enough, when you add a subscription product to the cart, there is no renewal date information unless you scroll to the very bottom and are able to read the very small text below the “recurring total” (see screenshot).

It would be way more helpful if dates (and specifically the WooCommerce subscription start date and end date) showed right under the product name inside the Cart table and in the Checkout page order review, so that the customer knows exactly what they are purchasing before having to figure that out.

So, here’s how it’s done. Enjoy!

Continue reading WooCommerce Subscriptions: Display Start-End Dates @ Cart & Checkout

WooCommerce: Hide “Shipping to…” Address @ Cart

Even when the “shipping calculator” is disabled on the WooCommerce Cart page, a “Shipping to…” string will appear in the cart totals if an address has been previously entered or if geolocation is enabled.

Most WooCommerce store owners, however, wish to remove / hide this text, as it can be confusing for the customer. In this quick tutorial, we’ll study two different workarounds to achieve the same result. Enjoy!

Continue reading WooCommerce: Hide “Shipping to…” Address @ Cart

WooCommerce: User Can Only Purchase A Product Once

In the era of online courses, subscriptions, custom-made products and product personalization, it may happen that you need to limit a specific WooCommerce product sales. For example – users may only purchase a trial product once in their lifetime.

In this short tutorial, we will see how this is done. Clearly, the user must be logged in in order for the code to trigger, so this applies to stores that require checkout login before proceeding with the order.

Enjoy!

Continue reading WooCommerce: User Can Only Purchase A Product Once

WooCommerce: Why Enable Sliding Cart?

Cart abandonments are a WooCommerce store owner’s worst nemesis – research suggests a whopping 69.8% of customers abandon shopping carts, causing a massive dip in sales and revenue. The same study also revealed that high and unexpected shipping charges, complicated checkout processes, and inability to see the order total are some major reasons behind cart abandonment. 

But what if there were ways you could overcome these problems and increase conversions? 

Well, we already covered a possible solution here, so we’ll add to that today by looking at floating cart plugins. 

These tools can help your customers view their shopping cart on any page of your WooCommerce store, saving them the back and forth between the page they’re currently on and the WooCommerce cart page. 

Customers can see the items they’ve added to the cart, the order total, shipping costs, and even check out – all without going to another page. This can help smoothen their experience at your store and fasten the buying process, translating into more sales and profits for you.

This article will explore some popular WooCommerce floating cart plugins you can use to leverage this feature on your store. But first, let’s understand how floating carts work and help your online store generate more sales. 

Continue reading WooCommerce: Why Enable Sliding Cart?

WooCommerce: Exclude Product From Discount Coupons

WooCommerce coupon settings allow you to define allowed products (or product categories). What’s missing, however, is the other way around: how to set up a product so that it can never be discounted?

Thankfully, a handy WooCommerce filter comes to the rescue (“woocommerce_coupon_is_valid_for_product“) and we can therefore make all coupons “invalid” when a given product is in the cart. Enjoy!

Continue reading WooCommerce: Exclude Product From Discount Coupons

WooCommerce: Get Total Spent By Customer

Enabling WooCommerce functionalities only if a “user spent more than X” is not unusual. For example, you may want to display banners, special offers, discounted prices, conditional content to customers who have purchased more than a given dollar threshold.

While coding a function that could get the total spent by a user ID, I stumbled upon a WooCommerce function that already achieves that, out of the box: wc_get_customer_total_spent( $user_id ).

You can use it as a conditional tag and run a function only when such threshold is reached. So, let’s see how to use it. Enjoy!

Continue reading WooCommerce: Get Total Spent By Customer

WooCommerce: Show Product Stock @ Cart Page

We’ve already seen how to display stock quantity and status on the Shop Page – today we’ll do something similar, but this time we’ll work on the Cart product table, so that we can visually display stock status and quantity to WooCommerce customers who are about to checkout.

Please note – in order for the snippet to work you must have “stock management” enabled, and also each single product in the cart must have “managing stock” checked and, if on backorder, “allow but notify customer” must be selected, otherwise you will see nothing. Enjoy!

Continue reading WooCommerce: Show Product Stock @ Cart Page

WooCommerce: How to Alter Cart Items Count

We’ve already seen how to exclude hidden products from the WooCommerce Mini-Cart widget counter; today I want to expand on the same concept and try to recalculate / alter such counter based on custom criteria.

For example, some business models require to count the number of distinct items in the Cart, no matter their respective cart quantities. So, if there are 2x “Item 1” and 4x “Item 2”, this altered counter would show 1+1=2 and not 2+4=6. So, let’s see how this is done – enjoy!

Continue reading WooCommerce: How to Alter Cart Items Count

WooCommerce: Show SKU @ Cart, Checkout, Order & Emails

When SKU matters to the end user, displaying it in the Cart page, Checkout page, Thank you page, My Account View Order page and Order Emails under the item name is a must.

Ideal for B2B businesses and international brands, this simple customization can help you learn how to add any sort of content under the Cart/Checkout/Order item names. Simply use the same hook and try “getting” something different than SKU with this guide. Enjoy!

Continue reading WooCommerce: Show SKU @ Cart, Checkout, Order & Emails