WooCommerce: Read-only Checkout Fields

Especially for B2B sites, it’s likely that customers are managed by the store admin and are not allowed to change their billing/shipping address unless they request to update it.

But even if you’re simply curious, there is a way to turn each checkout field into read-only inputs. In this way, the saved billing and shipping address will load, and the logged in customer won’t be able to change any data before checkout.

A little note: country and state are dropdowns, and this means adding the “readonly” attribute won’t stop you from changing the selected value. However, if we turn all fields to input type “text”, this problem will go away. And this is why you find two statements in the snippet below; first we turn the field into a text input, and then we make it read-only.

Enjoy!

Continue reading WooCommerce: Read-only Checkout Fields
WooCommerce: Remove “(optional)” From Checkout Field Labels

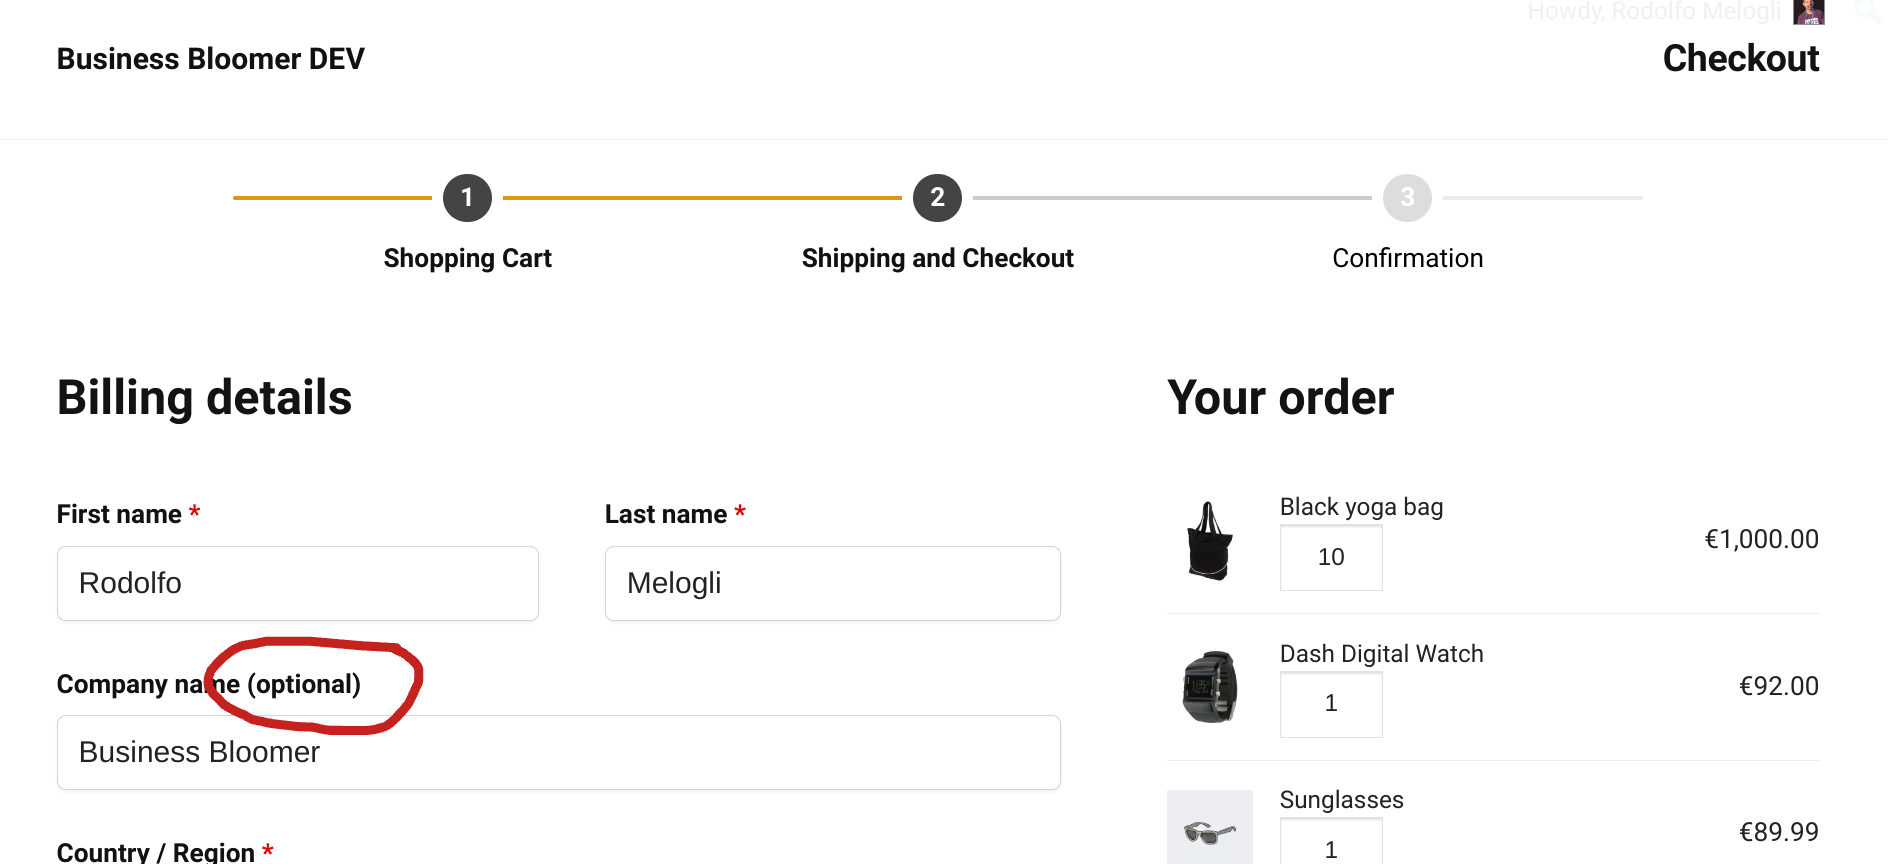
If a WooCommerce checkout field is set to “not required“, its label will get the “(optional)” suffix. Considering the required fields get the red “*” suffix, you may want to get completely rid of the (optional) string.

Sure, you could be using CSS to hide it… but as usual this is not ideal. With CSS display:none, the string loads and then you hide it; with PHP you avoid the loading in the first place.

So, let’s see how this is done – this snippet is also running on this same website so it should definitely work!

Continue reading WooCommerce: Remove “(optional)” From Checkout Field Labels

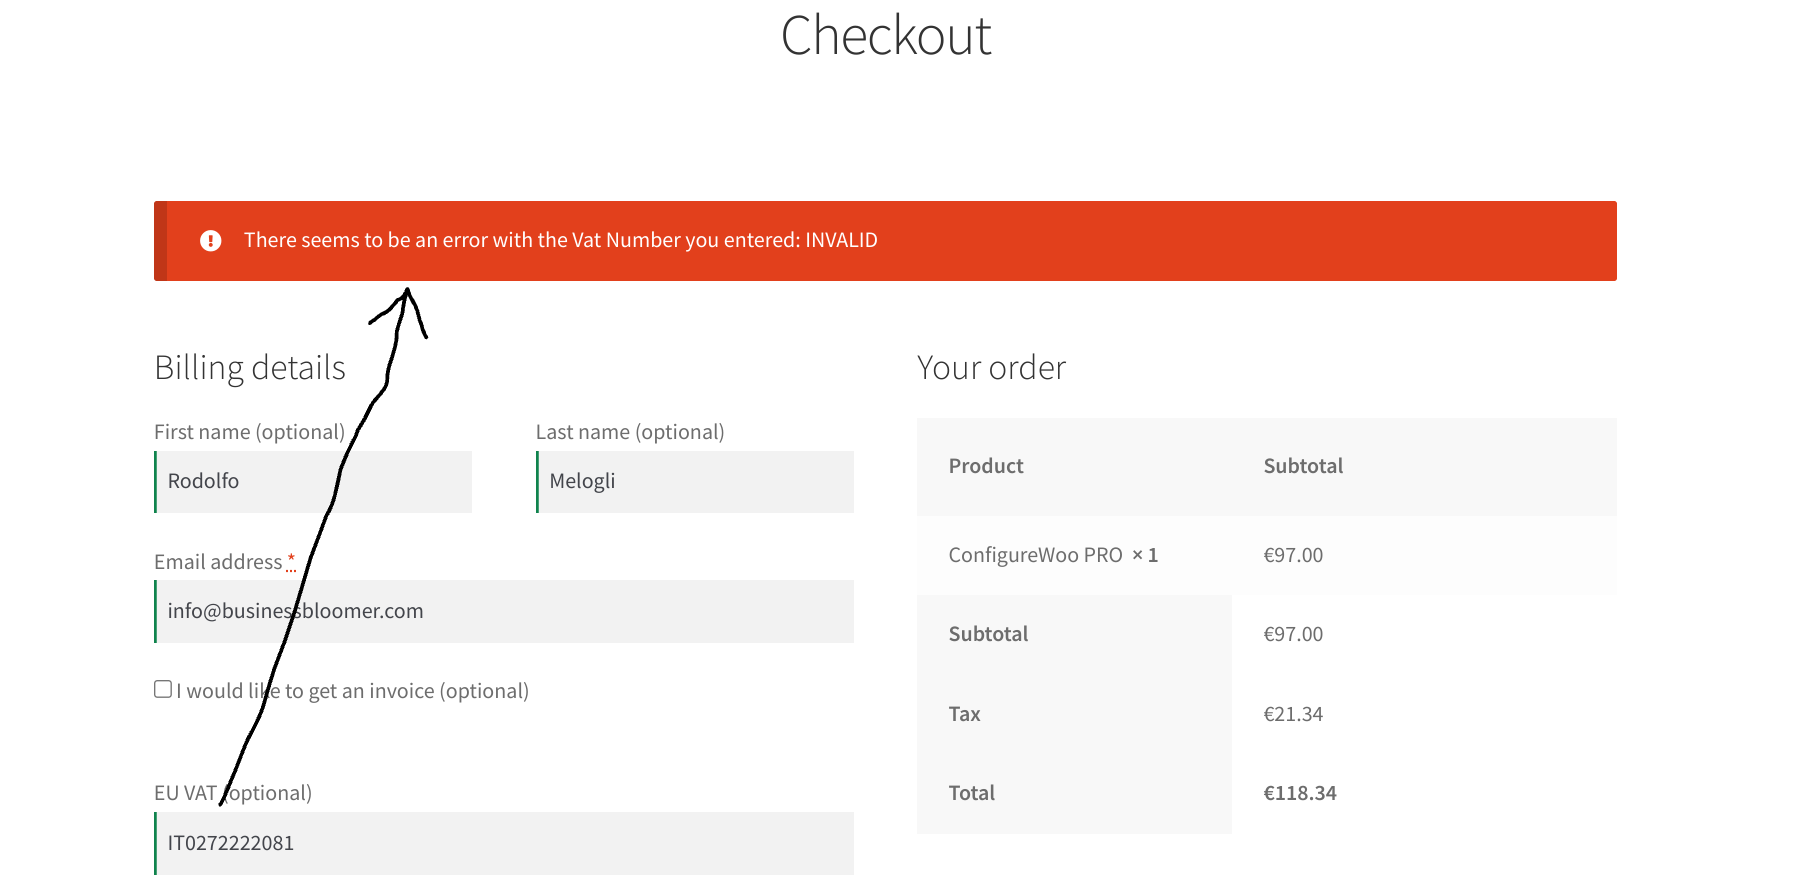
WooCommerce: Super Simple EU Vat Number Validation (VIES)

As an EU merchant dealing with VAT customers, I often find myself doing manual checks on the VIES VAT number validation website. Thankfully most of my customers are outside the EU so I don’t use the tool often, but still, for a developer this is just a waste of time!

By studying the available options on various online forums, I found a super simple workaround that doesn’t even require signing up for an API.

In fact, you can simply visit an URL and get the response straight away – which means we can access the same URL via PHP, get the response, and possibly return an error on the WooCommerce Checkout page in case the number is not valid.

Read on to find out how I use this validation on this same website.

Continue reading WooCommerce: Super Simple EU Vat Number Validation (VIES)

WooCommerce: Disable Checkout Field Autocomplete

By default, WooCommerce adds the “autocomplete” attribute to almost all checkout fields. For example, “billing_phone” has “autocomplete=tel”, “billing_country” has “autocomplete=country” and so on.

When logged out or if the logged in user has never done a purchase before, the WooCommerce Checkout page fields are possibly autofilled by the browser based on saved data / addresses.

Today, we’ll take a look at how to disable this autofill behavior, so that the customer is forced to enter data inside an empty input, and maybe in this way you can apply your custom validation or pattern, such as a specific phone number format. Enjoy!

Continue reading WooCommerce: Disable Checkout Field Autocomplete

WooCommerce: Refresh Checkout Upon Any Input Field Change

You may be aware that the WooCommerce Checkout page “order review” section reloads/refreshes every time there is a change of address – in this way shipping, taxes and optional fees are properly recalculated and customers are returned with the correct total.

But in case you add custom checkout fields that may cause a difference in pricing, or you want to keep the checkout UX consistent, or you have some other kinds of logic, it may be useful to refresh the order review section after a change on any checkout field. Enjoy!

Continue reading WooCommerce: Refresh Checkout Upon Any Input Field Change

WooCommerce: Upload File @ Checkout Page

No matter what you try, but simply adding an HTML input type=”file” won’t work on the WooCommerce Checkout page. I believe this is a security measure and as such, we need to find a workaround.

The only possible solution is to upload the file BEFORE the checkout is submitted, so that upon “Place Order”, the file is already available in the Media section and can be attached to the order as a simple string (URL).

Such upload can happen via Ajax, so that the customer won’t notice anything on the Checkout page – they are actually uploading a file to your website without even noticing it (yes, you need to apply some security measures, of course).

Here’s how it’s done – enjoy!

Continue reading WooCommerce: Upload File @ Checkout Page

WooCommerce: Add a New Country For Billing/Shipping

There are times when the WooCommerce countries database is simply not enough. While the WooCommerce team is usually very fast at updating its code (though, the newest country is apparently South Sudan, which became independent in 2011, the year WooCommerce launched!), you may need to DIY in certain cases.

Think of Northern Ireland for example. It’s not a “country”, however most Irish businesses would ship to Northern Ireland and not to “UK”, so having “Northern Ireland” in the Checkout page country dropdowns may help.

In this edge case study, we’ll basically take a look at how to add a custom country, how to make sure this custom country shows at checkout as a possible option (and in the shipping zones admin section), and also how to assign to it a custom list of states. You never know!

Continue reading WooCommerce: Add a New Country For Billing/Shipping

WooCommerce: Populate Checkout Fields From URL

On top of adding products to cart via URL and redirect to checkout, there is a way to also fill out the Checkout page input fields within the same link.

This could be super handy when you know the billing/shipping details of a registered or guest customer and want to speed up the order process.

It’s important to note that the URL will need to contain personal data e.g. email address, billing address, phone number, and so on; you need to make sure the URL is only shared with the specific customer (in an email, for example, as content is tailored to the subscriber; or only when the WooCommerce customer is logged in if you’re using the URL behind a website button).

Once that’s clear, let’s go ahead, and let’s see how my WooCommerce snippet works. Enjoy!

Continue reading WooCommerce: Populate Checkout Fields From URL

WooCommerce: 10 Most Popular Free Plugins

WooCommerce is one of the most popular eCommerce platforms that allows you to launch your online business, build high-functionality online stores for your clients, or take your brick-and-mortar store online.  

Powering over 28.19% of all online stores, WooCommerce’s versatility and open-source nature allow businesses to build their dream store, add unlimited products and consumers, take orders, and increase sales.

The core WooCommerce plugin holds 68% of the usage distribution – the highest on the internet. However, despite its popularity, the official WooCommerce plugin lacks several features you might need for your eCommerce store. But to make up for that, it offers several plugins that allow you to enhance your store’s functionality and improve customer experience. 

But choosing from over 4228 WooCommerce plugins from WordPress.org can get overwhelming. So, to make your job easier, we’ve hand-picked the best free WooCommerce plugins you can use on your store to take it to the next level. Let’s dive in!

Continue reading WooCommerce: 10 Most Popular Free Plugins

WooCommerce: Retain Field Values @ Checkout Reload

Go to WooCommerce Checkout as a logged out user. Fill out billing name, surname, address, email and phone. Change your mind and go back to Cart. Return to Checkout. Billing name, surname, email and phone (basically everything but the address) are gone!

But hey, this annoying WooCommerce flaw is about to go away with a few lines of code. Either reload the Checkout page or go back to it later – your info will still be there (as long as you haven’t cleared your cache/cookies and the WooCommerce session hasn’t expired of course).

Enhoy!

Continue reading WooCommerce: Retain Field Values @ Checkout Reload

WooCommerce: Phone Input Mask @ Checkout

The WooCommerce checkout page has a default phone input field that gets validated upon checkout (for HTML geeks, it’s actually an input type = “tel”). Usually, if such phone number contains letters, it will fail and checkout will stop.

But that’s not the problem. Let’s suppose you only have US customers, or that you want to force customer to enter a certain format (e.g. “+” or “01” as prefix)… well, there is no way to achieve that out of the box within the WooCommerce settings.

However, anything is possible in regard to customization, so all we need are 3 small changes: force the billing phone input to stay within a “maxlength“, set the phone input placeholder so that users know what the format should be before typing in, and finally add some JavaScript to provide an input “mask”, so that the final output is exactly what we want (123-456-7890 in this case scenario, but it could be anything).

Enjoy!

Continue reading WooCommerce: Phone Input Mask @ Checkout

WooCommerce: Top Checkout Field Editor Plugins

If you haven’t thought about checkout page customization before, perhaps it’s time to start doing so. 

There’s no question that it’s a hot topic in the WooCommerce community since, admittedly, the default checkout page leaves a lot to be desired.

You don’t want to be behind the curve. Here at Business Bloomer, Rodolfo has put out 90+ different checkout page snippets that have been eagerly lapped up by the WooCommerce developer and merchant community. Seriously, these are some of our most widely read and engaged posts. 

But in addition to snippets, it’s worth checking out some checkout field editor plugins. Sometimes, instead of a specific tool with a narrow focus, you need a Swiss army knife. Think of snippets as the tools, and checkout field editors as the Swiss army knife.

Continue reading WooCommerce: Top Checkout Field Editor Plugins

WooCommerce: Move Labels Inside Checkout Fields

Although UX and accessibility experts won’t like this customization, it’s still important to know “what’s possible” with WooCommerce.

In regard to the checkout form (billing + shipping + notes), there is a useful “woocommerce_checkout_fields” hook (filter) that is widely used by developers like me to alter the behavior of input fields.

In today’s episode we will take a look, indeed, at how to remove the checkout field labels from their default position (above fields), and use them as placeholders instead, so that we save up some vertical space.

Enjoy!

Continue reading WooCommerce: Move Labels Inside Checkout Fields

WooCommerce: Move Email Field to Top @ Checkout

This tutorial is a spin-off of a previous article (WooCommerce: Move / Reorder Checkout Fields) as I feel there is a huge boost of requests for this task alone.

Moving the billing email field to the top of the WooCommerce checkout gives you many benefits: because it’s the first field customers need to fill out, you can capture their email address (upon marketing permission) and send them cart reminders, feedback requests and similar if they do not complete the checkout.

Also, having the email first can make you save time in case the user is already registered, and you could save them time while checking this against the list of customers, so a prompt can be displayed to load all their billing/shipping details for example.

Either way, it’s super easy to move the email field to the top. Enjoy!

Continue reading WooCommerce: Move Email Field to Top @ Checkout

WooCommerce: Maxlength and Minlength for Checkout Fields

If you’re familiar with HTML, you can add “maxlength” and “minlength” attributes to an input field in order to force its value to be min X and max Y characters long. This is all good and easy, so we might as well see what happens on the WooCommerce Checkout page once we apply such attributes to a given custom field.

Spoiler alert: maxlength works, while minlength does not. Hence, forcing a given checkout field to have a minimum length is actually quite impossible, unless we validate the posted data (a field input value that is not long enough) once the checkout is submitted. That’s a bummer, and in this article I will also explain how to contact WooCommerce so they can improve a functionality / fix a bug.

Enjoy!

Continue reading WooCommerce: Maxlength and Minlength for Checkout Fields