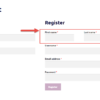
We’ve already seen how to add First & Last Name to the “My Account” register form. Today, I want to expand a bit and show you how to add and save a select box.

PHP Snippet: Add Select Field to “My Account” Register Form | WooCommerce
/**
 * @snippet       Add Select Field to "My Account" Register Form | WooCommerce
 * @how-to        Get CustomizeWoo.com FREE
 * @sourcecode    https://businessbloomer.com/?p=72508
 * @author        Rodolfo Melogli
 * @testedwith    WooCommerce 3.5.7
 * @community     https://businessbloomer.com/club/
 */

// -------------------
// 1. Show field @ My Account Registration

add_action( 'woocommerce_register_form', 'bbloomer_extra_register_select_field' );

function bbloomer_extra_register_select_field() {

    ?>

<p class="form-row form-row-wide">
<label for="find_where"><?php _e( 'Where did you find us?', 'woocommerce' ); ?>  <span class="required">*</span></label>
<select name="find_where" id="find_where" />
    <option value="goo">Google</option>
    <option value="fcb">Facebook</option>
    <option value="twt">Twitter</option>
</select>
</p>

<?php

}

// -------------------
// 2. Save field on Customer Created action

add_action( 'woocommerce_created_customer', 'bbloomer_save_extra_register_select_field' );

function bbloomer_save_extra_register_select_field( $customer_id ) {
if ( isset( $_POST['find_where'] ) ) {
        update_user_meta( $customer_id, 'find_where', $_POST['find_where'] );
}
}

// -------------------
// 3. Display Select Field @ User Profile (admin) and My Account Edit page (front end)

add_action( 'show_user_profile', 'bbloomer_show_extra_register_select_field', 30 );
add_action( 'edit_user_profile', 'bbloomer_show_extra_register_select_field', 30 );
add_action( 'woocommerce_edit_account_form', 'bbloomer_show_extra_register_select_field', 30 );

function bbloomer_show_extra_register_select_field($user){

  if (empty ($user) ) {
  $user_id = get_current_user_id();
  $user = get_userdata( $user_id );
  }

?>

<p class="form-row form-row-wide">
<label for=""><?php _e( 'Where did you find us?', 'woocommerce' ); ?>  <span class="required">*</span></label>
<select name="find_where" id="find_where" />
    <option disabled value> -- select an option -- </option>
    <option value="goo" <?php if (get_the_author_meta( 'find_where', $user->ID ) == "goo") echo 'selected="selected" '; ?>>Google</option>
    <option value="fcb" <?php if (get_the_author_meta( 'find_where', $user->ID ) == "fcb") echo 'selected="selected" '; ?>>Facebook</option>
    <option value="twt" <?php if (get_the_author_meta( 'find_where', $user->ID ) == "twt") echo 'selected="selected" '; ?>>Twitter</option>
</select>
</p>

<?php

}

// -------------------
// 4. Save User Field When Changed From the Admin/Front End Forms

add_action( 'personal_options_update', 'bbloomer_save_extra_register_select_field_admin' );
add_action( 'edit_user_profile_update', 'bbloomer_save_extra_register_select_field_admin' );
add_action( 'woocommerce_save_account_details', 'bbloomer_save_extra_register_select_field_admin' );

function bbloomer_save_extra_register_select_field_admin( $customer_id ){
if ( isset( $_POST['find_where'] ) ) {
   update_user_meta( $customer_id, 'find_where', $_POST['find_where'] );
}
}


hi, how could I record the new custom field in the _users table in the wordpress database ?
Hi Jose, thanks so much for your comment! Yes, this is definitely possible, but I’m afraid it’s custom work. If you’d like to get a quote, feel free to contact me here. Thanks a lot for your understanding!
thanks for these numerous snippets! A great many of them are in use with us!
I’m trying to change this a bit …
The point is that we don’t need a select field, but a text field …
the background: it is about the possibility that the “new” user can enter a name by which he was “invited”.
So far we had solved this via an email invite plugin, but they are no longer GDPR compliant….
I replaced the following in the show field @ My Account Registration:
But what needs to be done in the section “Display invited Field @ User Profile (admin) and My Account Edit page (front end)”
<label for=""><?php _e( 'Hat dich jemand eingeladen?', 'woocommerce' ); ?>  </label>
<input type="text" class="input-text" name="invite_from" id="invite_from" value="">
<div pseudo="-webkit-textfield-decoration-container">
        <div>
            <div contenteditable="plaintext-only"><?php if (get_the_author_meta( 'invite_from', $user->ID ) == ??????????????????</div>
        </div>
Can you help me? Thanks, Karsten
Did you also save it (part 2)?
Hi Rodolfo
How can I add conditional logic to the field i.e greater than 18 years
Thanks
Hi Gideon, thanks so much for your comment! Yes, this is definitely possible, but I’m afraid it’s custom work. If you’d like to get a quote, feel free to contact me here. Thanks a lot for your understanding!
What happens to your additional php code when there is an update to wordpress / woocommerce? Will it need re-applying?
Hi Steve, it’s unlikely but yes, like all plugins and snippets it might need to be revised in case WooCommerce changes its coding
Hell there,
This is like the best Woocommerce customization website i’ve ever come across. Thank you very much for the valuable site.
I am trying to customized the My Account > Account Details – I would like remove the password option completely and I am trying to integrate OTP service by MiniOrange. Please lemme know how to remove the password related option from there to replace with the OTP option.
thanks,
Louis
Hi Louis, thanks so much for your comment! Yes, this is definitely possible, but I’m afraid it’s custom work. If you’d like to get a quote, feel free to contact me here. Thanks a lot for your understanding!
Hi Rodolfo,
Thank you for the tutorial and it’s great. I added a field quite similar and everything looks good until the last step. When I try change the choice and save it, woocommerce would say it updates successfully. But it’s not. It remains the previous choice. Could you please help me out? Thanks a lot.
Thank you Sophia 🙂 If you use the exact copy of my snippet, does it work/save?
Hey Rodolfo,
Thank you for the code. It is of a great help!
Just wanted to notify you that there is a extra closing bracket at the end of the code which needs to be removed.
Thanks,
Monika
Thank you 🙂
Hi there,
When you changed the channel where this person has found the website, from e.g. Google to Facebook, and I save it, it does not change it and returns back to the initial choice.
=(
You’re right John 🙂 I found a few bugs, so in 5 minutes I will publish the revised snippet!
Rodolfo,
This code is excellent! You are saving me again! There isn’t a plugin to accomplish these simple tasks.
I am going to use this code for one of our Woocommerce sites. I was wondering if it would be difficult to add two features? The first, to make it required. The second, instead of Google, Facebook and twitter, I have Groups enabled for users and would want the choices to be Group A, Group B and Group C. Once the option is picked. I want it to post the selection and update to the user’s profile.
Many thanks for your hard work.
Javier
Javier, thanks so much for your comment! Yes, this is possible – but unfortunately this is custom work and I cannot provide a complementary solution here via the blog comments. Thanks a lot for your understanding! ~R
Hello Rodolfo!
This is excellent! I would like to use this form to have someone select the type of account they are registering for. The two account types are Employer and Candidate. Any help would be greatly appreciated!
Alexander, thanks so much for your comment! Yes, this is possible – but unfortunately this is custom work and I cannot provide a complementary solution here via the blog comments. Thanks a lot for your understanding! ~R
thanks you so much :*
🙂
Hello Rodolfo,
Just want to say thanks for the tutorials – very informative!
Quick question in the section with option values of slt,prt, and ltd – are these random values?
    <option value="slt" ID ) == "goo") echo 'selected="selected" '; ?>>Google
    <option value="prt" ID ) == "fcb") echo 'selected="selected" '; ?>>Facebook
    <option value="ltd" ID ) == "twt") echo 'selected="selected" '; ?>>Twitter
The reason i am asking is I am working on using 8 fields (which I renamed in the Show field @ My Account Registration section) but there seems to be no correlation between that and the code pasted above. Just trying to understand the methodology here 🙂
Thanks!
Michael
Hey Michael, thanks for your comment! Yes, you can rename those to whatever you like, as long as you’re consistent in the input value and the echo “selected” check. Let me know