Adding a custom field to your WooCommerce checkout is a breeze. It’s a fantastic way to collect extra information from your customers. It could be a custom Billing field, a Shipping field, or a completely unrelated custom field.
But while you can easily view the custom field data in the backend, editing it directly from the order admin is a frustratingly locked feature. This presents a significant challenge for businesses needing to modify order details post-purchase.
Luckily, a bit of custom code can fix this, giving you the flexibility and control you need to manage your orders effectively.
Let’s dive in and explore how to overcome this hurdle. Enjoy!

PHP Snippet: Edit Order Custom Field Value From WooCommerce “Edit Order” Admin Page
In order to make the snippet below work, you’ll need to know the custom field “key“.
If you’ve added the custom field by custom code in the checkout page, this is easily available to you – otherwise if you’re using a plugin you will need to find out what that is.
In my case , that is “_billing_tax“, and you will notice you have to search/replace it with your custom key for a total of 6 times in the code below.
/**
 * @snippet       Edit Custom Field @ Woo Edit Order Page
 * @how-to        businessbloomer.com/woocommerce-customization
 * @author        Rodolfo Melogli, Business Bloomer
 * @compatible    WooCommerce 9
 * @community     https://businessbloomer.com/club/
 */

add_action( 'woocommerce_admin_order_data_after_billing_address', 'bbloomer_order_custom_field_input' );

function bbloomer_order_custom_field_input( $order ) {
    echo '<div class="address">'; // REQUIRED!
    echo '<p><b>Tax number:</b> ' . $order->get_meta( '_billing_tax' ) . '</p>';
    echo '</div>';
    echo '<div class="edit_address">'; // REQUIRED!
    woocommerce_wp_text_input(
		array(
			'id'    => '_billing_tax',
			'label' => 'Tax number',
			'value' => $order->get_meta( '_billing_tax' ),
		),
		$order
	);
    echo '</div>';
}

add_action( 'woocommerce_process_shop_order_meta', 'bbloomer_order_custom_field_save' );

function bbloomer_order_custom_field_save( $order_id ) {
    if ( isset( $_POST['_billing_tax'] ) ) {
		$order = wc_get_order( $order_id );
		$order->update_meta_data( '_billing_tax', sanitize_text_field( $_POST['_billing_tax'] ) );
		$order->save();
	}
}
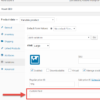
Once this is done, you can open the single order admin page, scroll to “Billing” and click on the pencil icon. The “Tax number” field as per this screenshot will become an editable input:


Hey Rodolfo,
So i’ve got custom fields of account number and project number against billing and shipping fields respectively. These fields actually pre-populate in the checkout from custom fields created against a user profile.
I’ve got everything working, except when it comes to manually creating an order in the admin screen. If I select a user from the dropdown for whom the order is for, and load the billing / shipping addresses, it doesn’t populate the account / project numbers, despite trying multiple different ways, I can’t seem to get it to load the values.
Any ideas on how to do this?
Cheers, Chris.
You also need a function to save them into the correct order meta, I guess? Without looking at the code I can’t give you a definite answer I’m afraid
Is there a way to change the sorting of the fields in admin? for exaample if I have a field company_2 (building) and address_3 (number). how can I move them up into the right place so it makes sense? it works with frontend fields bei changing the priority. But how in admin edit mode?
Hello, I guess you need to look into the ‘woocommerce_admin_billing_fields’ filter, which contains the array of billing fields to display, and maybe you can add your own custom fields to it. Let me know!