The WooCommerce Checkout page plays a huge role in your ecommerce success. It is one of the most important part of your conversion funnel. This is the page that brings revenue.
It doesn’t matter how many people are visiting your website – if no one makes any purchase. Complicated checkout process is one of the main reasons for shopping cart abandonment.
You should always look for ways to make your checkout process as simple as possible. If you are using WooCommerce as your ecommerce solution you can easily change the checkout page design, remove or change the existing checkout fields order.
- Understanding Classic Checkout vs. Checkout Block in WooCommerce
- WooCommerce Classic Checkout Page
- Customizing The Checkout Fields
- Remove Checkout Fields
- Change Checkout Field Label or Placeholder Text
- Make The Required Checkout Fields Optional
- Move or Re-order Checkout Fields
- Add New Checkout Billing or Shipping Fields
- Add Custom Checkout Fields (Not Billing or Shipping)
Understanding Classic Checkout vs. Checkout Block in WooCommerce
When customizing WooCommerce checkout fields, it’s essential to recognize the difference between the “classic” (also known as “legacy”) checkout and the newer “checkout block” introduced by the Block Editor.
The classic checkout is the traditional WooCommerce structure and supports extensive customizations through hooks, filters, and PHP. Most tutorials and snippets are designed for this method, making it the go-to choice for developers and store owners looking for flexibility.
On the other hand, the checkout block is part of the WooCommerce Blocks feature. While it offers a modern design and drag-and-drop editing capabilities, its customizability is limited compared to the classic checkout. Many customizations—especially those requiring backend PHP tweaks—may not work with the block-based checkout.
Before making changes, confirm which checkout type your store uses. If you need deep customizations, sticking to the legacy checkout might be the better option.
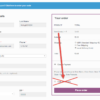
WooCommerce Classic Checkout Page

By default, WooCommerce requires below information from the customers:
- First name
- Last name
- Company name
- Country
- Address line 1
- Address line 2
- Town/City
- Province/County/District
- Postcode/ZIP
- Phone
- Email address
- Order notes
Do you need them all? Probably not.
Do you need to add custom fields? That’s also possible.
See your options below.
Customizing The Checkout Fields
You can customize your WooCommerce checkout fields with either custom code or WooCommerce extensions.
Just for reference, here’s a full list of fields in the array passed to woocommerce_checkout_fields filter hook. It will help you map out & understand the code snippets below.
/**
* Billing Checkout Fields
*/
      billing_first_name
      billing_last_name
      billing_company
      billing_address_1
      billing_address_2
      billing_city
      billing_postcode
      billing_country
      billing_state
      billing_email
      billing_phone

/**
* Shipping Checkout Fields
*/
      shipping_first_name
      shipping_last_name
      shipping_company
      shipping_address_1
      shipping_address_2
      shipping_city
      shipping_postcode
      shipping_country
      shipping_state

/**
* Account Checkout Fields
*/
      account_username
      account_password
      account_password-2

/**
* Order Checkout Fields
*/
      order_comments
Each field that get passed to woocommerce_checkout_fields contains an array of below properties:
- type – type of field (text, textarea, password, select)
- label – label for the input field
- placeholder – placeholder for the input
- class – class for the input
- required – true or false, whether or not the field is require
- clear – true or false, applies a clear fix to the field/label
- label_class – class for the label element
- options – for select boxes, array of options (key => value pairs)
Remove Checkout Fields
Now to remove the fields you don’t want in your WooCommerce checkout page, use this snippet and change the array keys accordingly to the list above:
add_filter( 'woocommerce_checkout_fields', 'bbloomer_remove_woo_checkout_fields' );

function bbloomer_remove_woo_checkout_fields( $fields ) {
    unset( $fields['billing']['billing_first_name'] );
    return $fields;
}
Change Checkout Field Label or Placeholder Text
If you want to change the labels and placeholder of the checkout fields, use this snippet:
add_filter( 'woocommerce_checkout_fields', 'bbloomer_rename_woo_checkout_fields' );

function bbloomer_rename_woo_checkout_fields( $fields ) {
    $fields['billing']['billing_first_name']['placeholder'] = 'New placeholder';
    $fields['billing']['billing_first_name']['label'] = 'New label';
    return $fields;
}
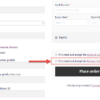
Make The Required Checkout Fields Optional
By default certain fields of the checkout page are required. There is no way a user can complete the purchase without filling those correctly. If you want to make those field optional and not mandatory, use this PHP:
add_filter( 'woocommerce_checkout_fields', 'bbloomer_required_woo_checkout_fields' );

function bbloomer_required_woo_checkout_fields( $fields ) {
    $fields['billing']['billing_first_name']['required'] = false;
    return $fields;
}
Move or Re-order Checkout Fields
You can change the default order of checkout fields using the tutorial. For example, you could display the email field first instead of first name.
Add New Checkout Billing or Shipping Fields
Here are some examples:
Add Custom Checkout Fields (Not Billing or Shipping)
You can add your own WooCommerce custom checkout fields and use this data in various ways.


All of those things are available right now one way or another in Checkout block, maybe not the same code, but doable nevertheless. Happy to help you update the document 😀
Amazing! Sure, if you could share how to get the same things done with the Checkout Block, that would be fantastic!
The article is very helpful, but I noticed that several of the recommended plugins no longer exist or have been discontinued. It would be great to update the list so that users don’t end up with broken links. Thanks for the great work, but an update on the plugins would be much appreciated!
Much appreciated! I removed the plugin all together and cleaned up the tutorial – thank you
Thank you very much for all your hard work Rodolfo. I have been using your snippets for years and they have always been helpful!
Thanks!
How can we make sure customers only enter alphanumeric characters in Woocommerce checkout customer fields (name, last name), avoiding them using emojis or other special characters?
Also, on wordpress registration forms…
Thank you!
I’m pretty sure you can add the “pattern” custom attribute and force “a-z0-9” only
Thanks for this information.
It’s working fine when we use a shortcode-based checkout page. But, it’s not working with “WooCommerce Checkout Block (Gutenberg)”. One of our customers uses the Checkout Block for their checkout.
For more information see this – https://woocommerce.com/document/using-the-new-block-based-checkout/
Is there any way to customize checkout fields with Checkout Block?
Looking forward to your reply.
Thanks,
Sahil
Blocks are not customizable, so it’s a no-go for me and for all of those who love customizing PHP templates.
Hi, the function for changing the label of the fields is not working for Country, ZIP and State.
Thanks for your feedback Ahmed! Sometimes you need to use the “woocommerce_default_address_fields” filter instead, see here https://woocommerce.com/document/tutorial-customising-checkout-fields-using-actions-and-filters/#section-2