Is it possible to insert a custom loop item, such as a promotional banner or a “fake” product, into the WooCommerce shop page after a specific number of real products – for example, after the third one?
Spoiler alert: yes, it is!
This won’t alter the results counter though (“Showing 1–12 of 10138 results“), and only works on the “classic” Shop Page, but we can live with that.
In this post, we’ll explore a simple way to inject custom HTML into the shop loop at a specific position, without affecting pagination or breaking layout. This solution is ideal for inserting ads, upsells, or custom notices directly in the WooCommerce product grid. Enjoy!

PHP Snippet: Display a Fake Product After a Specific Product in the WooCommerce Shop Loop
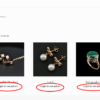
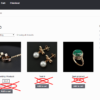
This snippet adds a promotional block to the WooCommerce shop page, placing it exactly after the third product in the loop.
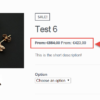
It hooks into woocommerce_after_shop_loop_item, which runs after each product’s content is output. The function checks the current loop index, and when it reaches 3 (i.e. after three products), it outputs a custom <li> element styled like a product. This includes an image, a title (“Promotion”), and a message (“Win a free tablet!”).
It also handles WooCommerce layout classes like first and last to keep the grid aligned correctly. The loop counter is manually increased to ensure the layout doesn’t break.
This is a clean way to inject non-product content into the grid without modifying the product query itself — perfect for special offers, ads, or custom calls to action.
/**
 * @snippet       Display Ad After 3rd Product @ WooCommerce Shop Loop
 * @tutorial      https://businessbloomer.com/woocommerce-customization
 * @author        Rodolfo Melogli, Business Bloomer
 * @compatible    WooCommerce 9
 * @community     https://businessbloomer.com/club/
 */

add_action( 'woocommerce_after_shop_loop_item', 'bbloomer_display_fake_product_position_4', 9999 );

function bbloomer_display_fake_product_position_4() {
	$loop_index = wc_get_loop_prop( 'loop', 0 );
	$columns = absint( max( 1, wc_get_loop_prop( 'columns', wc_get_default_products_per_row() ) ) );
	if ( $loop_index === 3 ) {
		wc_set_loop_prop( 'loop', $loop_index + 1 );
		$loop_index = wc_get_loop_prop( 'loop', 0 );
		if ( 0 === ( $loop_index - 1 ) % $columns || 1 === $columns ) {
			$class = ' first';
		} elseif ( 0 === $loop_index % $columns ) {
			$class = ' last';
		} else $class = '';
		echo '</li>';
		echo '<li class="product' . $class . '">';
      echo '<a href="https://example.com" target="_blank">';
      echo '<img src="/wp-content/uploads/2025/04/special-offer.png">';
      echo '<h2 class="woocommerce-loop-product__title">Promotion</h2>';
		echo '<span class="price">Win a free tablet!</span>';
      echo '</a>';
	}
}