The WooCommerce My Account pages feature a “left sidebar” navigation menu (by default, links are: “Dashboard”, “Orders”, “Downloads”, “Addresses”, “Account details”, “Logout”).
A cool (and easy) improvement may be moving such navigation to the top, and displaying it horizontally instead of vertically. You’d think this is a complex PHP customization… but you’ll feel great when you’ll notice you just need CSS for that.
Please note the CSS may change slightly based on your theme, in case it applies custom CSS to the default WooCommerce My Account navigation panel. I will list below a couple of solutions for default WooCommerce and for the Storefront theme, so at least you have an idea of what you could need in terms of tweaking it. Enjoy!

CSS Snippet (Default WooCommerce): Display My Account Navigation Menu Horizontally As Opposed to Vertically
First thing, we want to stretch the My Account navigation and the My Account tab content onto a full width on big devices (by default, WooCommerce already applies such rule for devices up to 768px):
@media only screen and (min-width: 769px) {
   .woocommerce-account .woocommerce-MyAccount-content, .woocommerce-account .woocommerce-MyAccount-navigation {
       float: none;
       width: 100%;
   }
}
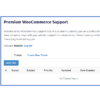
Here’s the result:

Second, we need to center align the navigation menu (UL tag) and make its items move horizontally (LI tags):
@media only screen and (min-width: 769px) {
   .woocommerce-MyAccount-navigation ul {
       text-align: center;
   }
   .woocommerce-MyAccount-navigation ul li {
       display: inline-block;
   }
}

CSS code, all together, so you can copy/paste:
@media only screen and (min-width: 769px) {

   .woocommerce-account .woocommerce-MyAccount-content, .woocommerce-account .woocommerce-MyAccount-navigation {
       float: none;
       width: 100%;
   }

   .woocommerce-MyAccount-navigation ul {
       text-align: center;
   }

   .woocommerce-MyAccount-navigation ul li {
       display: inline-block;
   }

}
CSS Snippet (Storefront Theme): Display My Account Navigation Menu Horizontally As Opposed to Vertically
Note: the My Account page must use the “Full width” template that comes with the Storefront theme.
@media (min-width: 768px) {

   .storefront-full-width-content .woocommerce-MyAccount-navigation, .storefront-full-width-content .woocommerce-MyAccount-content {
      width: 100%;
      float: none;
   }

   .storefront-full-width-content .woocommerce-MyAccount-navigation ul {
      text-align: center;
   }

   .storefront-full-width-content .woocommerce-MyAccount-navigation ul li {
      display: inline-block;
      border: 1px solid rgba(0,0,0,.05);
      padding: 0 1em;
   }

}
Is There a (Reliable) Plugin For That?
If you’d love to code but don’t feel 100% confident with CSS, I decided to look for a reliable plugin that achieves the same result.
In this case, I recommend the YITH WooCommerce Customize My Account Page plugin. On top of changing the navigation menu layout, you can also customize the color scheme, add banners, set up reCaptcha on the register and login forms, add, sort, rename, delete and group tabs, conditionally show tabs to a given user role and much more.
But in case you hate plugins and wish to code (or wish to try that), then keep reading 🙂


I did something similar for a client though I used flex for the list:
.woocommerce-MyAccount-navigation ul { display: flex; gap: 5px; justify-content: space-evenly; list-style-type: none; }Nice!
I believe you must get rid of the float:none; in the very first part of the code, because it causes some of the content to overlap the menu. I don’t know the reason why, it just does.
Thanks!
Hey Rodolfo,
I have recently started reading your posts and have learnt a lot. I have been trying to horizontally align the menu on WordPress 5.7 with your snippet . The first desk-lay gets centre aligned but when u click on any of the menu item it goes back to being displayed vertically.In effect it is not working.
Tx
No idea, sorry!
Probably browser cache issue, means the css you changed is not applyed but loaded from cache.
1. Try to clean cache
2. Try to add this css code from Customizer
3. May be because of wrong css classes in your theme (this will works only in standard woo commerce template structure)
I hope it helps
Works great. Thanks 🙂
Cheers
Thanks for this trick!
Glad you enjoyed it!
Great tip, thanks. I added 40 px padding-right because I got the menu items too close to each other. Maybe Divi-related?
Yeah, could be. Great!