WooCommerce: Send Checkout User Info to Email Recipient

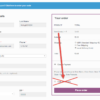
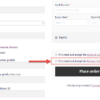
When my blog readers become official Business Bloomer supporters, a few custom fields are conditionally displayed on the WooCommerce checkout (thanks to this snippet or this other snippet).

For example I show a custom user Twitter field. Thanks to the snippets, this is automatically saved into the WordPress User Profile page. But as I love to thank each Business Bloomer supporter on Twitter, I wanted to generate an additional email reminder (to myself, or to an assistant’s email address for example) with the Twitter username I should be thanking. You might need something like this if you need to send a new customer email address to a coworker. Or maybe a new address to a dropshipper…

So, how do you send a custom email with some user information, after such user completes the checkout and a new WooCommerce order is created?

Send WooCommerce Checkout User Information to a custom Email Recipient

PHP Snippet: Send Checkout User Info to Email Recipient – WooCommerce

/**
* @snippet Send Checkout User Info to Email Recipient  - WooCommerce
* @how-to Get CustomizeWoo.com FREE
* @sourcecode https://businessbloomer.com/?p=73259
* @author Rodolfo Melogli
* @testedwith WooCommerce 3.2.4
*/

add_action( 'woocommerce_checkout_update_user_meta', 'bbloomer_checkout_field_update_user_meta' );
 
function bbloomer_checkout_field_update_user_meta( $user_id ) { 
	
if ( $user_id && $_POST['twitter'] ) {
	
	// if custom input field name = "twitter" >> then use $_POST['twitter']
	bbloomer_email_with_twitter_username( $_POST['twitter'] );
	
}
	
}

function bbloomer_email_with_twitter_username( $username ) {

		$to = '[email protected]';
    	$subject = 'Reminder: New Business Bloomer Fan to Thank on Twitter';
    	$message = 'Hey Rodolfo, please remember to send a Tweet to: ' . $username;
    
		wp_mail( $to, $subject, $message );
	
}

Was this article helpful?
YesNo

Where to add custom code?

You should place PHP snippets at the bottom of your child theme functions.php file and CSS at the bottom of its style.css file. Make sure you know what you are doing when editing such files - if you need more guidance, please take a look at my guide "Should I Add Custom Code Via WP Editor, FTP or Code Snippets?" and my video tutorial "Where to Place WooCommerce Customization?"

Does this snippet (still) work?

Please let me know in the comments if everything went as expected. I would be happy to revise the snippet if you report otherwise (please provide screenshots). I have tested this code with Storefront theme, the WooCommerce version listed above and a WordPress-friendly hosting.

If you think this code saved you time & money, feel free to join 17,000+ WooCommerce Weekly subscribers for blog post updates and 250+ Business Bloomer supporters for 365 days of WooCommerce benefits. Thank you in advance!

Need Help with WooCommerce?

Check out these free video tutorials. You can learn how to customize WooCommerce without unnecessary plugins, how to properly configure the WooCommerce plugin settings and even how to master WooCommerce troubleshooting in case of a bug!

Rodolfo Melogli

Business Bloomer Founder

Author, WooCommerce expert and WordCamp speaker, Rodolfo has worked as an independent WooCommerce freelancer since 2011. His goal is to help entrepreneurs and developers overcome their WooCommerce nightmares. Rodolfo loves travelling, chasing tennis & soccer balls and, of course, wood fired oven pizza.

Questions? Feedback? Support? Leave your Comment Now!
_____

If you are writing code, please wrap it between shortcodes: [php]code_here[/php]. Failure to complying with this (as well as going off topic, not writing in English, etc.) will result in comment deletion. You should expect a reply in about 2 weeks - this is a popular blog but I need to get paid work done first. Please consider joining BloomerArmada to get blog comment reply priority, ask me 1-to-1 WooCommerce questions and enjoy many more perks. Thank you :)

Your email address will not be published. Required fields are marked *