WooCommerce: Add a WordPress Customizer Setting

If you’ve taken the ConfigureWoo online course, you’ll know that WooCommerce adds its own “WordPress Customizer” section called “WooCommerce”, indeed. From there you can manage some settings such as the store notice, product images, checkout fields and so on.

What if you want to add your own settings, and let yourself or your client toggle options or type input values, so that this can be applied to your current WooCommerce website? Well, that’s quite doable, so in this post we’ll see how they do it. Enjoy!

If you go to WordPress Dashboard > Appearance > Customize you will see the “WordPress Customizer”. By default, WooCommerce plugin adds its own “WooCommerce” section to the Customizer, and from there you can manage some settings.

PHP Snippet: Add a WordPress Customizer WooCommerce Custom Setting

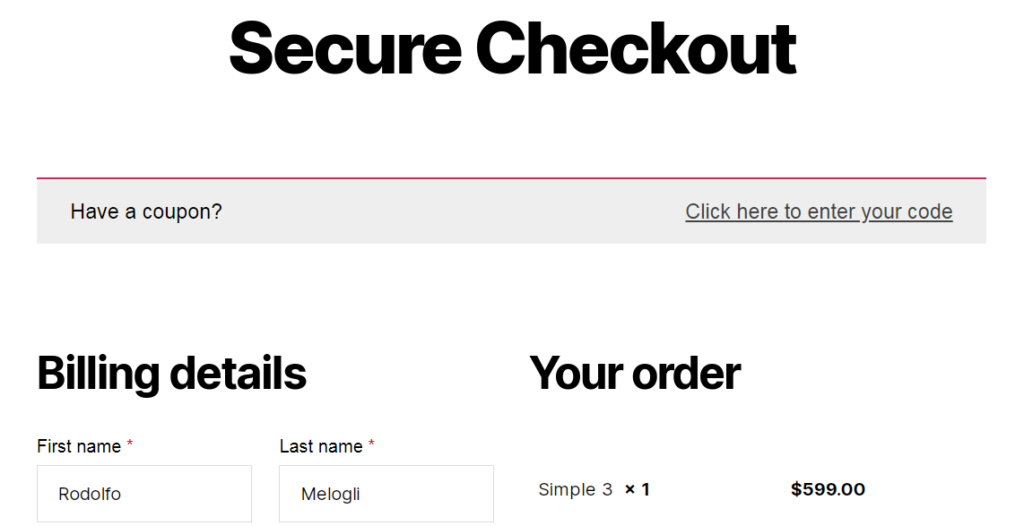
In this example, we will be adding a checkbox to the “WooCommerce” > “Checkout” WordPress Customizer existing section, which will switch between 2 columns checkout layout (default for some WooCommerce themes such as Storefront, 2021, etc.) and a 1 column checkout layout (already the normal behavior for mobiles, so billing is followed by shipping and finally by order review, but we want here to get the same on desktops as well).

As you can see inside the snippet there are 3 parts:

  1. add_setting(): this WordPress function creates the option
  2. add_control(): this WordPress function controls the option, tells WP it’s a checkbox and in which section should show (woocommerce_checkout in the example below)
  3. conditional CSS: this is CSS that only triggers if the option is enabled (checkbox checked in this case)
/**
 * @snippet       WordPress Customizer Setting - WooCommerce
 * @how-to        Get CustomizeWoo.com FREE
 * @author        Rodolfo Melogli
 * @compatible    WooCommerce 4.6
 * @community     https://businessbloomer.com/club/
 */

add_action( 'customize_register', 'bbloomer_woocommerce_wordpress_customizer_css_option' );

function bbloomer_woocommerce_wordpress_customizer_css_option( $wp_customize ) {
	$wp_customize->add_setting( 'woocommerce_checkout_switch_col_layout', array(
		'default' => 'no',
		'type' => 'option',
		'capability' => 'manage_woocommerce',
		'sanitize_callback' => 'wc_bool_to_string',
		'sanitize_js_callback' => 'wc_string_to_bool',
	));
	$wp_customize->add_control( 'woocommerce_checkout_switch_col_layout', array(
		'label' => 'Switch layout',
		'description' => 'Optionally switch to a 1-column checkout on desktops',
		'section' => 'woocommerce_checkout',
		'settings' => 'woocommerce_checkout_switch_col_layout',
		'type' => 'checkbox',
	));
}

add_action( 'wp_head', 'bbloomer_switch_checkout_cols_css' );

function bbloomer_switch_checkout_cols_css() {
	if ( true === wc_string_to_bool( get_option( 'woocommerce_checkout_switch_col_layout', 'yes' ) ) ) {
	?>
	<style type="text/css">
		.woocommerce-checkout form .col2-set, .woocommerce-checkout form #order_review, .woocommerce-checkout form #order_review_heading {
			width: 100%;
			float: none;
			clear: none;
			padding-left: 0;
			padding-right: 0;
		}
	</style>
	<?php
	}
}


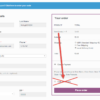
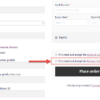
Before & After Screenshots

Before: on desktop my theme shows a 2 columns checkout.
After: once my custom setting (a checkbox) is checked, my checkout layout on desktop goes onto 1 column.

Where to add custom code?

You should place custom PHP in functions.php and custom CSS in style.css of your child theme: where to place WooCommerce customization?

This code still works, unless you report otherwise. To exclude conflicts, temporarily switch to the Storefront theme, disable all plugins except WooCommerce, and test the snippet again: WooCommerce troubleshooting 101

Related content

  • WooCommerce AMA with Rodolfo Melogli (Ask Me Anything Woo #1)
    I am Rodolfo Melogli, founder of Business Bloomer, WooCommerce development expert, WordPress freelancer, WordCamp speaker, content marketing geek and (like you) small business owner. This is the first ever WooCommerce AMA (Ask Me Anything) session on Business Bloomer. Rodolfo Melogli will be donating 72 hours of his time and will be available to answer your […]
  • WooCommerce: Cart and Checkout on the Same Page
    This is your ultimate guide – complete with shortcodes, snippets and workarounds – to completely skip the Cart page and have both cart table and checkout form on the same (Checkout) page. But first… why’d you want to do this? Well, if you sell high ticket products (i.e. on average, you sell no more than […]
  • WooCommerce: Disable Payment Method If Product Category @ Cart
    Today we take a look at the WooCommerce Checkout and specifically at how to disable a payment gateway (e.g. PayPal) if a specific product category is in the Cart. There are two tasks to code in this case: (1) based on all the products in the Cart, calculate the list of product categories in the […]
  • WooCommerce: Add Privacy Policy Checkbox @ Checkout
    Here’s a snippet regarding the checkout page. If you’ve been affected by GDPR, you will know you now need users to give you Privacy Policy consent. Or, you might need customer to acknowledge special shipping requirements for example. So, how do we display an additional tick box on the Checkout page (together with the existing […]
  • WooCommerce: Redirect to Custom Thank you Page
    How can you redirect customers to a beautifully looking, custom, thank you page? Thankfully you can add some PHP code to your functions.php or install a simple plugin and define a redirect to a custom WordPress page (as opposed to the default order-received endpoint). This is a great way for you to add specific up-sells, […]

Rodolfo Melogli

Business Bloomer Founder

Author, WooCommerce expert and WordCamp speaker, Rodolfo has worked as an independent WooCommerce freelancer since 2011. His goal is to help entrepreneurs and developers overcome their WooCommerce nightmares. Rodolfo loves travelling, chasing tennis & soccer balls and, of course, wood fired oven pizza. Follow @rmelogli

Questions? Feedback? Customization? Leave your comment now!
_____

If you are writing code, please wrap it like so: [php]code_here[/php]. Failure to complying with this, as well as going off topic or not using the English language will result in comment disapproval. You should expect a reply in about 2 weeks - this is a popular blog but I need to get paid work done first. Please consider joining the Business Bloomer Club to get quick WooCommerce support. Thank you!

Your email address will not be published. Required fields are marked *