
On a daily basis, you probably use drag-and-drop in a variety of interfaces. For instance, drag and drop your Gmail items to its category, upload files to WordPress media library, or organize your phone home screen apps.
While many page builder platforms come in to help you design your website with drag-and-drop, building WooCommerce transactional emails is still considered as a complex task.
By default, WooCommerce email settings only allow you to change basic color profiles and text. In order to customize further, you will have to modify the theme code.
If you are a non-techie and don’t want to crack the code between the scripts in wp-content/plugins/woocommerce/templates/emails/email-styles.php or so, using a drag-and-drop email builder framework is the best solution.
Introducing YayMail
YayMail is an email builder platform deployed for WooCommerce.
It has been developed with ease of use as the primary goal, but has been tested for maximum web browser and email client compatibility while keeping an eye on responsiveness.
You can download and use it for free from WordPress.org. This open source code is forever free and you won’t have to upgrade to any premium version to fully customize all the default Woo email templates.
Now that you’ve installed and activated it, head over to WooCommerce > Email Customizer to access the email editor.
Design emails using the drag and drop email builder
As a drag-and-drop editor similar to Elementor page builder, YayMail comes with all the options and settings on the same screen.
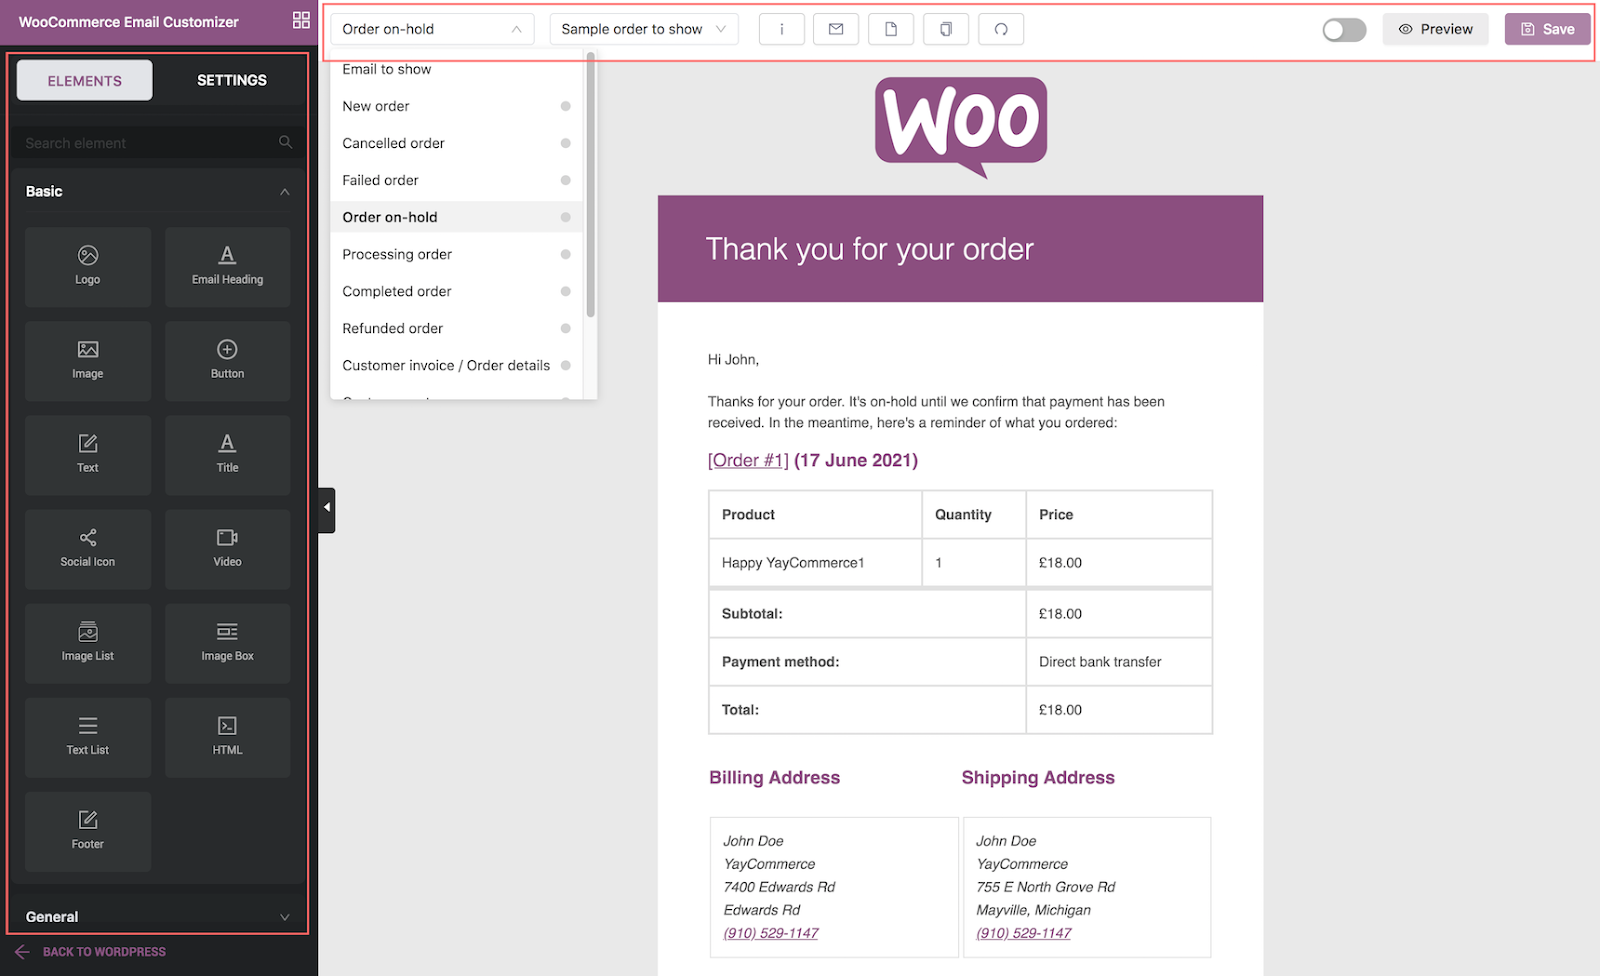
1. Upper toolbar
Here you will find the first dropdown for all the available WooCommerce email templates. Depending upon the active WooCommerce plugins on your current site, you’ll see new templates over here.
If using a WooCommerce membership plugin, you’ll have extra email templates such as Membership – Welcome, Membership Reminder, Expired Membership and so on.

The second dropdown, “Sample order”, allows you to pick any real order to see how the email’s dynamic fields show on a specific shopper’s end.
On this upper toolbar, you can also find the most used action buttons including:
- Shortcodes: Copy a shortcode from here then paste it into the appropriate block of the email design.
- Send test email: One-click to send a test message to any email address to see how your designed email would look like in the inbox.
- Blank: Clear all the email blocks so that you can have a completely blank canvas then you can start designing for your own purposes.
- Copy template: Copy from a previously designed template and paste it into the current email body. Then you can make some little adjustments, so as to avoid starting from scratch.
- Reset template: This option resets your template to the initial state, meaning you still have the default email blocks.
- Preview: Instantly see your customized email on desktop and mobile views.
- Save: Save your edits at any point in time.
2. Collapsible side panel
The YayMail WooCommerce email customizer’s side panel consists of two tabs: Elements and Settings.
All elements are draggable and include tons of customization options. The heading block, for instance, allows you to edit its padding, background color, text color, font family, and other visual options.
While the changes in the Elements tab apply only to the chosen block, the adjustments in Settings take effect for the whole email template.
Some frequently used features thus include:
- Email container width
- Peripheral background color
- Hide/Show product image and SKU
- Export/Import email templates

3. Email preview
Since it’s a block-based email builder, you can move any blocks up/down or use the handle to drag and drop it.
On the right corner, you’ll have some options like:
- Duplicate the email block
- Copy the block to another template
- Remove block

With YayMail, there are endless customizations you can make by changing the email designs and layouts, which is not happening if you modify theme code files or use WordPress customizer.
Case study: customize WooCommerce order confirmation email
To start customizing the order confirmation email, go to WooCommerce > Email Customizer > Email to show. From there, you can choose either Processing order or Completed order.
From then on, you can start adding any elements you’d like. Some elements I’m going to be using include:
- Logo: Upload a transparent logo image and resize it to make it aligned with the email container width
- Social icons: Easily choose the social network icons and add the URL for each platform
- Heading: Edit the heading text, heading font, text color, and background color
- Image: Add a custom image and adjust its width using the slide bar
- Footer: Add your website links such as My account, Customer support, etc.
At any point in time, you can click on the Preview button to see the email appearance on desktop/mobile in a popup without having to leave or refresh the current page.
Then, you can easily close the previewer to come back to the editor.

To see YayMail in action, check out this tutorial video to see how it helps you get the job done.
Integrations
Transactional email is a good means of communication for your marketing purpose. Especially when you offer a subscription or membership model through WooCommerce, you should customize the email notifications to make your brand profile bespoke and consistent.
Case Study 1: WooCommerce Membership plugin
By default, this is what your audience receives when their membership at your site is expiring. You can edit the text of the subject, head, and custom message.

Why not turn this email template into a call to action to make sure the audience will come back to their membership package?
For this extra content, I’ll be using multiple columns for the Expiring Membership email message.
The steps go as follows:
- Drag and drop a 2-column block onto the email
- Edit the column width in percentage, i.e. 70/30
- Add background color or image (optional), here I use white as background color
- Pick a text block for the first column
- Pick an image strip for the second column

That’s how I achieve a multiple column email template for the membership email messages.
Case Study 2: WooCommerce Follow-up emails plugin
With a custom email template extension like Follow-Ups, you can send extra content after specific customer actions have been done.
There are so many store scenarios in which scheduled automatic emails with custom content can be sent.
In this section, I’m demonstrating how to create and customize the email template to be sent after a coupon is used.
Firstly, start adding a new follow-up:
- Give it a name, email subject, and some content
- In the Follow-up Type metabox, make sure to choose Purchase Email
- In the bottom boxes, choose trigger as “after coupon used”
- It comes with plenty of advanced options, so feel free to explore it

Then, let’s move on the customization steps:
- Insert logo and heading
- Add an image box element
- Insert content and social icons
Since I’m trying to set the tone for my brand’s color profiles, a pinkish color will be used for the heading background color and also the main image in the image box element.

Designing the blocks is easy so all’s left to do is to adjust the padding between the email blocks to achieve the looks and feels you’ve always wanted.
Quick note: please refer to their Docs to make sure you get the right YayMail addon for your current active WooCommerce extensions.
Case Study 3: loyalty rewards plugins
A Points and Rewards extension for WooCommerce may generate 10+ email notifications to touch base with customers.
The email templates vary depending upon the plugin you use, but basically it looks like a text message. From the Points Notification settings you can write your own messages in the Email Description box using their shortcode.

Then, save the changes and head over to our WooCommerce email customizer. From the dropdown, choose Points and Rewards email to start customizing the template.
Let’s spice up by adding some more media elements such as images, buttons, and links.
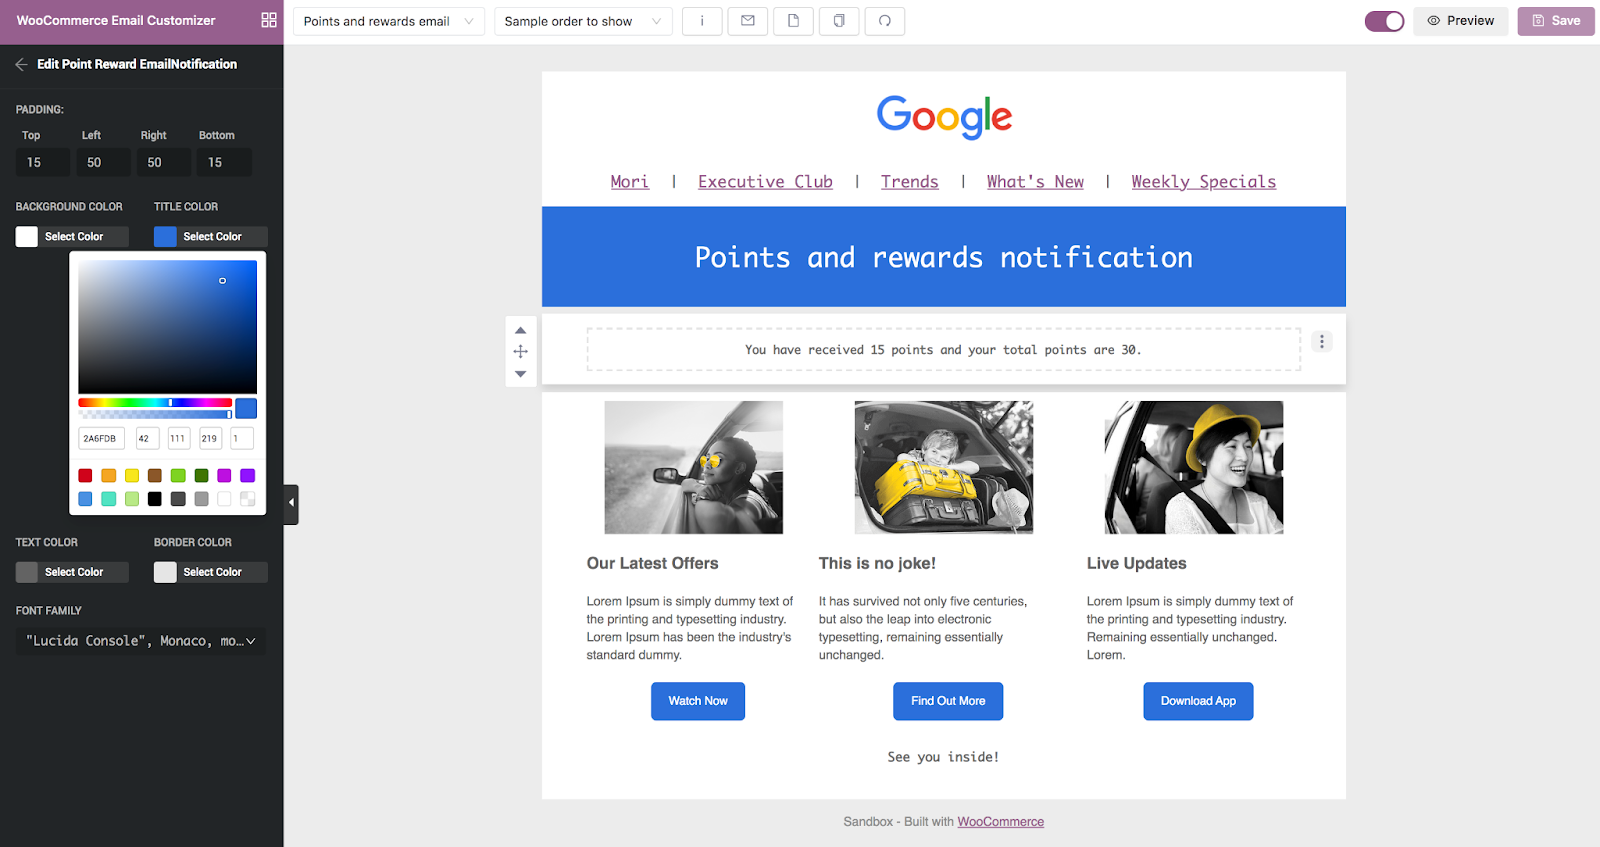
This new design will take effect on all the Points notifications to be sent out. Only that the middle notice block will be replaced with the messages you’ve just written in the previous step.
Conclusion
There are several methods for WooCommerce email template customization without coding. If source code modification is not your choice, then you can try customizing emails with the help of plugins.
Some plugins utilize the WordPress customizer to design email templates. However, a drag and drop email builder will help you create a much more flexible layout with advanced options.
Today you can try it out by downloading YayMail from the WP repo and use it completely risk-free as it works seamlessly with all WordPress themes.


Hello,
This is a beautiful plugin but in my case even after enabling the templet settings, woocommerce is sending the original emails and not yaymails- how do I solve this issue?
Sabahath
Not sure, please contact YayMail support and they’ll look after your issue
This YayMail editor seems to be very cool but… it does not support displaying product attributes. For me this is very important, so it’s a big con.
You could ask support, maybe they’re working on it already
Hi ErykJ,
YayMail’s editor supports a variety of attributes such as:
– standard attributes: product image, SKU, variant color, size, etc.
– third party attributes: vendor name, vendor link, subscription package…
(screenshot: https://tppr.me/booyw)
Depending on the Woo extensions in use, you will see other attributes displaying.
Which product attributes you have in mind?
Please show us and we’re ready to be working on it.
Hi Rodolfo, what’s your opinion on the most reliable way to edit emails from the official Advanced Notifications for WooCommerce plugin without editing the template files?
Hi Alex, I’ve got no opinion as I don’t know or use that plugin, sorry