Here is a collection of tips, snippets, customizations and how-to tutorials to answer your biggest WooCommerce questions, curated by Rodolfo Melogli.
Please remember feedback is vital and that your social media shares, blog comments and WooWeekly newsletter sign ups help me understand which WooCommerce content works and which not, so that I can fine-tune my writing :)
Thank you in advance and enjoy!

In a WooCommerce store, I have two roles: Customer and Professional. In the WooCommerce options, I have selected to display prices in the cart and checkout with taxes included.
Now, I need for the Professional role to have the opposite setting, that in the cart and checkout the prices are displayed without taxes included.
Is there a way to modify that option depending on the role? If it is possible to do so, is there a filter or a clue from which I can start researching?

We use the plugin “WooCommerce Ajax Filter’ to have some filters on attributes. Apparently they use the Lookup Table.
Recently the filters weren’t working that good, not all products were shown. After regenerating the Lookup Table, the filters were working again.
The question is now: is there an indication when to regenerate it again? Also core WooCommerce uses that Lookup table, but it’s not clear to me when to run it again cause it’s not always obvious to see those filter issues.

Hi everyone! I’m trying to modify my WooCommerce order status and I want to add two new ones: In Fulfillment and Payment on Product Pick-up.
Every time an order is placed on your WooCommerce website, the purchased products’ total_sales counter increases thanks to a core function. It’s then easy to retrieve the value and maybe show the number of sales on the single product page, which is great for social proof and sales conversion rate optimization.
The big problem – and don’t ask me why this is not into core – is that if you need to refund an order (or cancel it), the total_sales counter will not reset / decrease, which is odd.
Today we’ll fix this, so that your products are always up to date with their sales counter and you can be more confident in showing the correct values. Enjoy!
Continue reading WooCommerce: Decrease Product ‘Total Sales’ Upon Refund

Today’s customization will feature a custom shortcode that you can use to display content only to logged in customers: [customers-only]content for customers here e.g. video iframe[/customers-only]
This is perfect for membership sites, LMS platforms, paywalled content.
In my case, only premium Club members with a ‘CLASS’ pass can watch upcoming WooCommerce masterclasses and past recordings, so I needed the shortcode to hide the video to logged out users or logged in customers without a pass.
By wrapping the video iframe HTML inside the shortcode, I can show the video to logged in customers who purchased a given product ID, or alternatively show an error message, which you can see in action here, in the “The recording is now available!” section: https://www.businessbloomer.com/class/behind-the-scenes-how-i-run-business-bloomer/
So, how did I do it? Find out below, and hope you can use it too!
Continue reading WooCommerce: Conditionally Display Content to Customers [Shortcode]

So, I’ve built my own event management system for WooCommerce.
My objective was to embed a form on the event registration page, and then programmatically create a free WooCommerce order for that customer – so I can track the number of attendees (orders) and follow up with email automations (customers).
You can already see the system in action on the “How to Contribute to WooCommerce Core” event page: you can clearly see an email input and a “Register Now” button inside the “You’re invited” section. That’s the form – actually a Fluent Forms plugin contact form.
And then there is a simple snippet that hooks into the Fluent Form submission, and conditionally generates a WooCommerce order.
In this post, you’ll learn about a quick way to create a Fluent Forms form on your WordPress site, about the “fluentform/validate_input_item_input_email” hook, and finally about the wc_create_order() WooCommerce function that, of course, let us generate an order automatically. Enjoy!
Continue reading WooCommerce: Create Order From Contact Form Submission
The “Default sorting” dropdown sorts products by menu_order and then title on the WooCommerce Shop, Category and Tag pages.
But what if you want to place the featured products first in the list (I mean, why would anyone set products as featured if you can’t really “promote” them on the Shop page)?
In today’s case study, we will replace the “Default sorting” option with a workaround, create a new one with the same label (so that customers won’t notice it), set it as the default sorting option, and make sure it sorts by featured products first, and then by menu_order and title. Enjoy!
Continue reading WooCommerce: Sort By Featured Products @ Shop

Black Friday and Cyber Monday (BFCM) are just around the corner. Is your WooCommerce site prepared? I hope so!
While time is running out, there are a number of things you can do to get ready. In this post, we’ll cover eight of the most important ones.
The potential of a Black Friday / Cyber Monday deal shouldn’t be underestimated. Indeed, many eCommerce sites report that a significant percentage of their annual revenue comes from sales during this brief period of time.
Additionally, it’s important to remember that nearly all businesses run a BFCM sale, which means that anyone who doesn’t have an offer is missing out.
Before we jump into the eight important things you can do, a final note: failing to prepare may cost you a serious amount of missed revenue. Amazon, for example, stands to lose $13.22 million per hour of downtime! While that’s an extreme example, it is a reminder that downtime should be avoided as much as possible during once-a-year sales events.
Continue reading WooCommerce: Preparing Your Site for Black Friday / Cyber Monday

Scalability is a vital factor to consider when setting up your WooCommerce store. It refers to the ability of your website to handle increased traffic and transactions as your business grows.
Essentially, it’s about accommodating growth without hampering site performance or user experience. If you foresee significant growth for your online store, scalability has to be one of your primary considerations from day one.
Hosting plays an integral part in ensuring scalability because as demand surges, server capabilities must keep up too. A scalable hosting solution will mitigate potential problems related to heavy traffic, and can upgrade resources accordingly to ensure smooth operation at all times.
If you’re a WooCommerce site owner and you are concerned about how well your setup can scale, read on for a rundown of the main aspects that matter when it comes to hosting, and the choices you have available.
Continue reading WooCommerce: How Hosting Impacts Scalability
Here’s a great customization that all store managers should implement on their WooCommerce website!
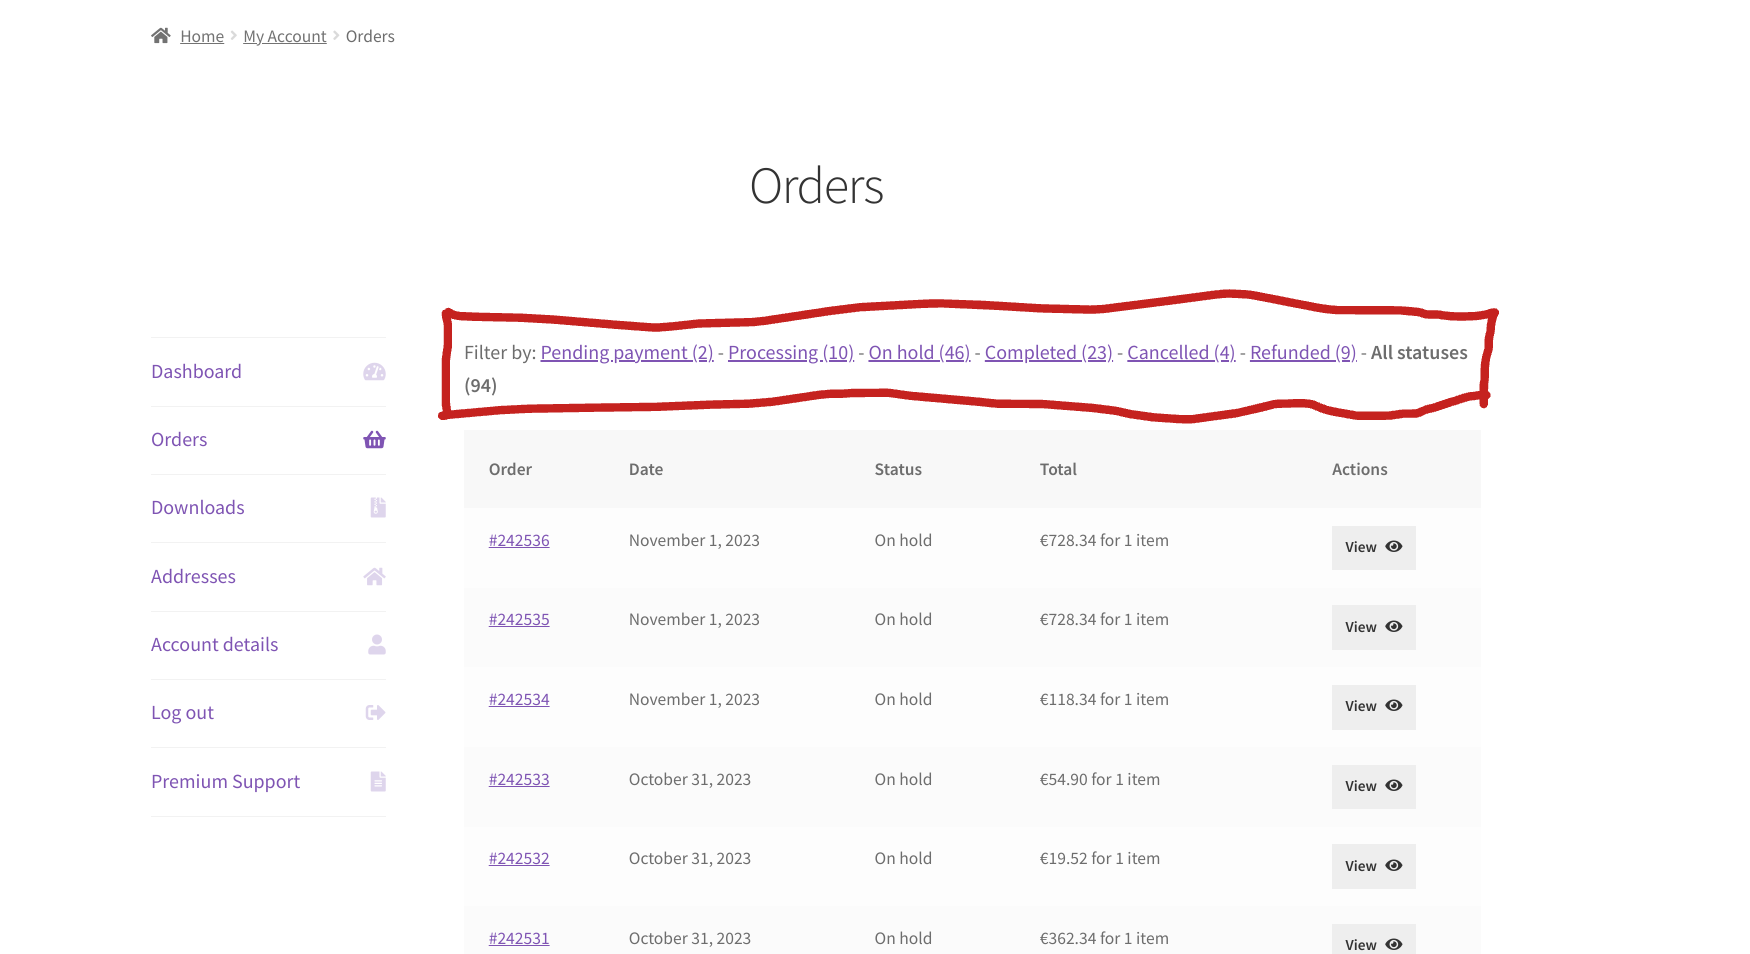
For some reason you can refine the backend orders table if you are an admin, but logged in customers can’t filter by order status under My Account > Orders!
This is pretty bad, especially if you run a store where customers place many orders and the My Account Orders tab is full of entries. It may be helpful for customers to search all “Pending” orders for example, or maybe access al their “Completed” ones to download their files again.
So, here’s the fix – you’re welcome!
Continue reading WooCommerce: Filter By Order Status @ My Account Orders
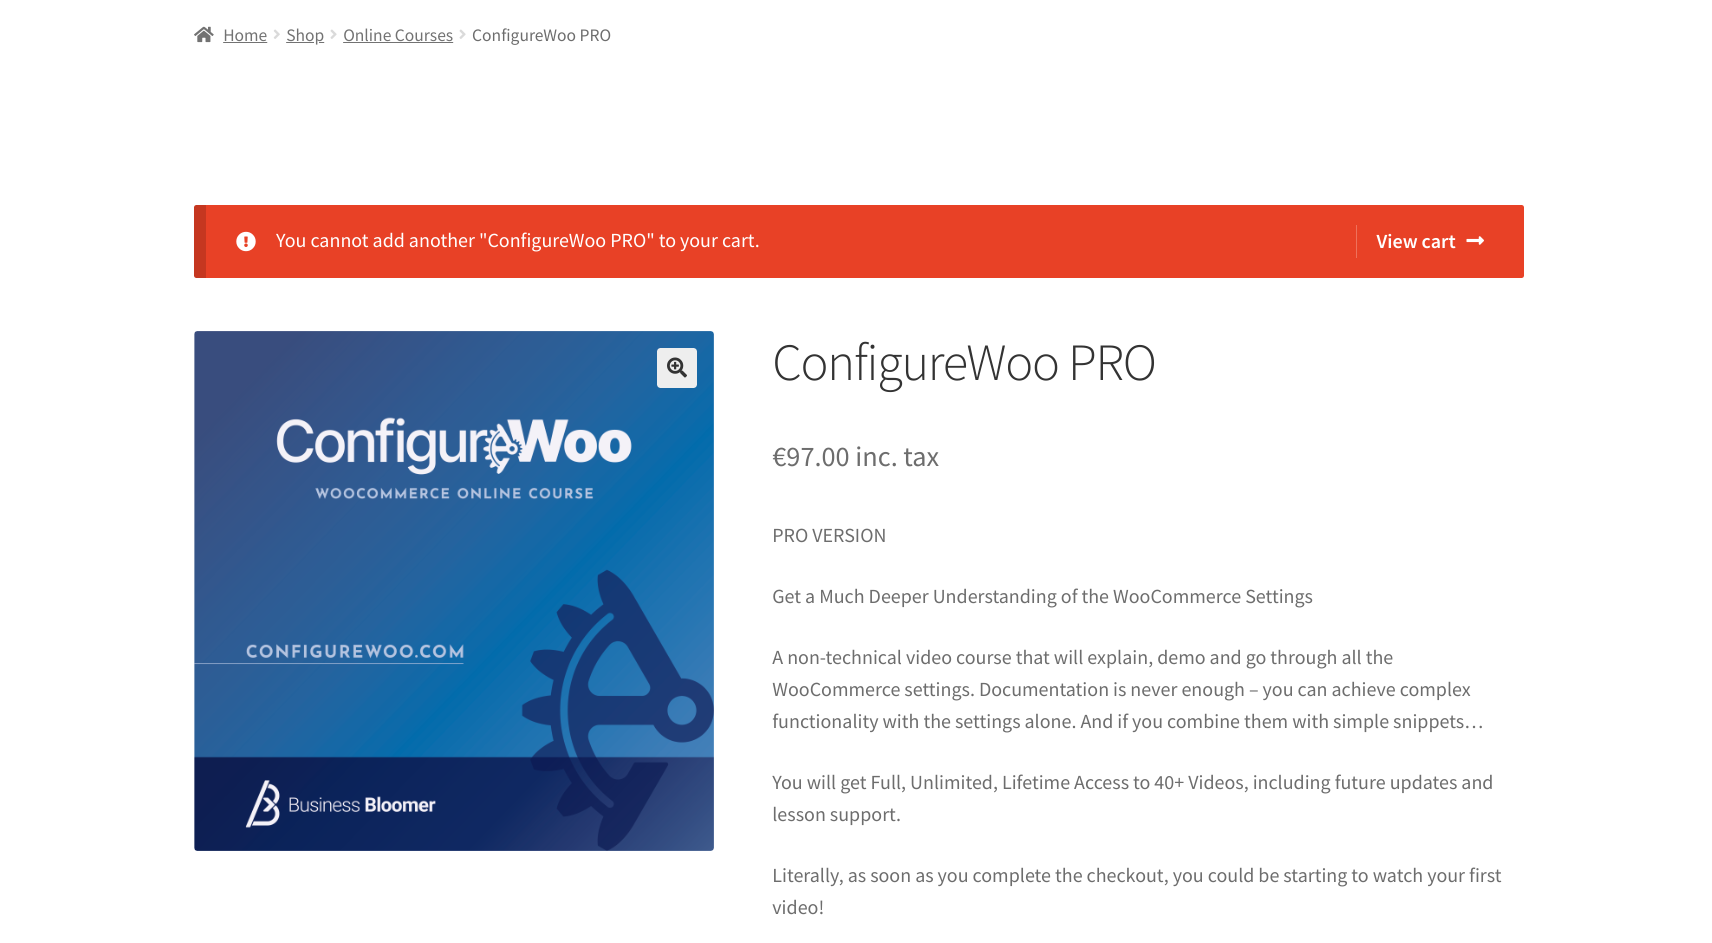
When a WooCommerce product is set to “Sold Individually”, you can only add 1 item to the cart. If you try a second time, you will get the “You cannot add another “%s” to your cart” error message, so that the customer is aware that there is already that product in the cart.
However, you may want to either edit the message wording or completely remove it, especially if you automatically redirect to cart or checkout upon add to cart.
So, let’s study how to do the latter, which is much more complex than using the ‘woocommerce_cart_product_cannot_add_another_message‘ filter for editing the message content. Enjoy!
Continue reading WooCommerce: Disable “You cannot add another __ to your cart” Message
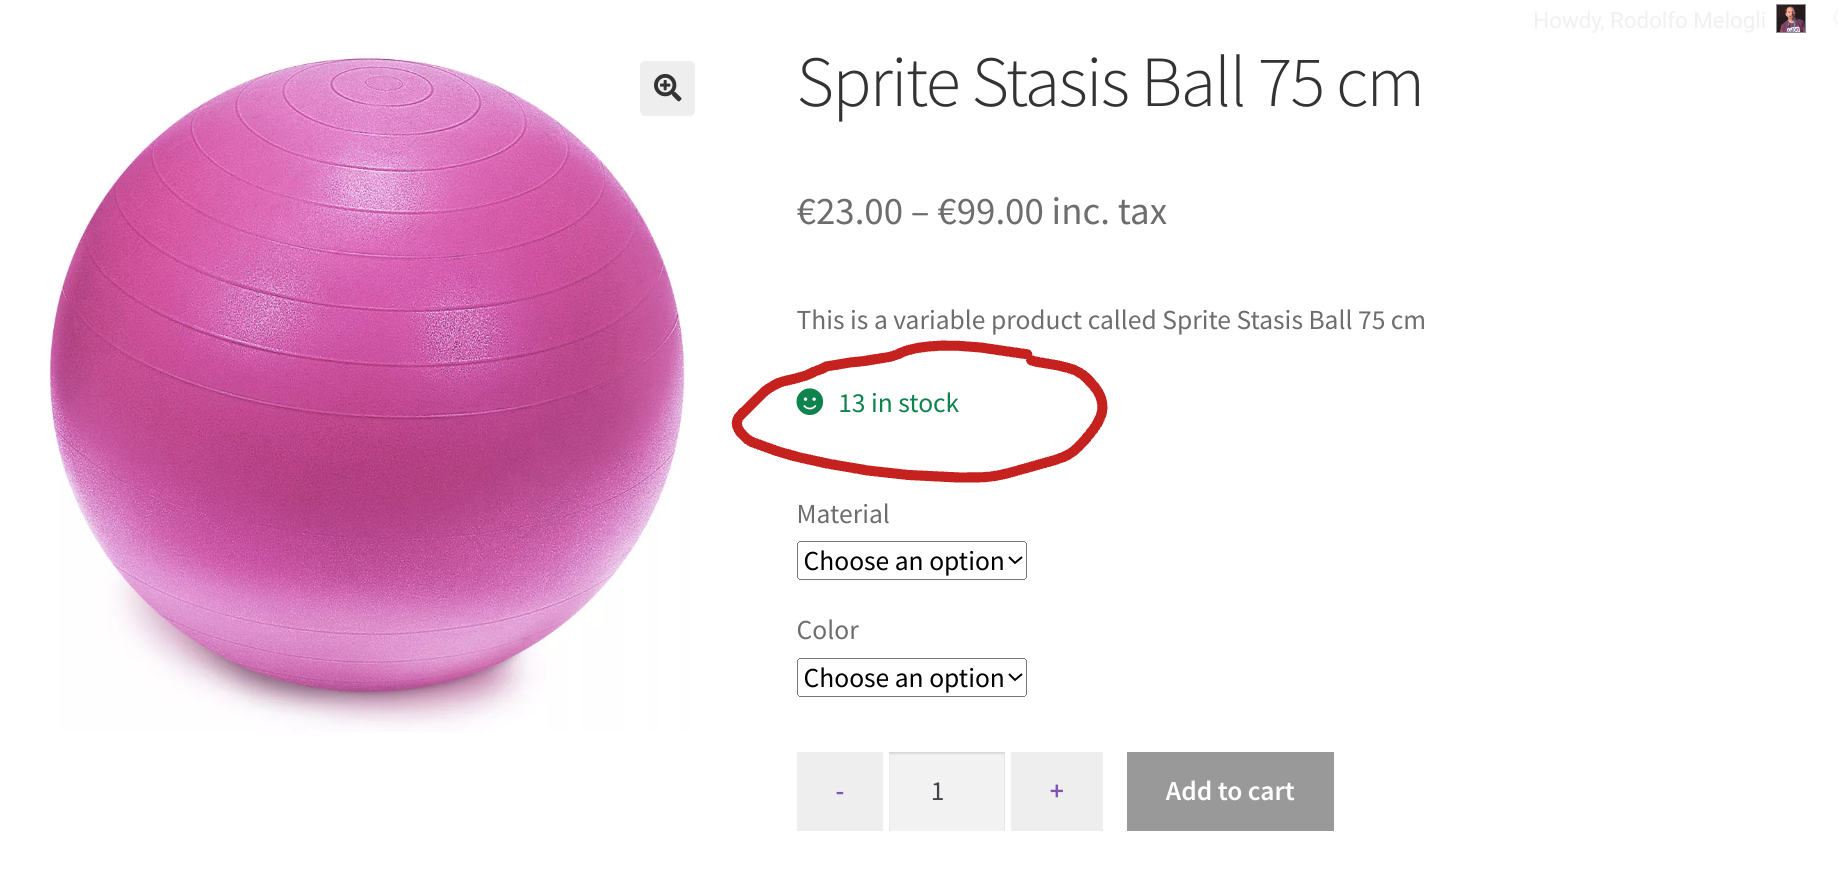
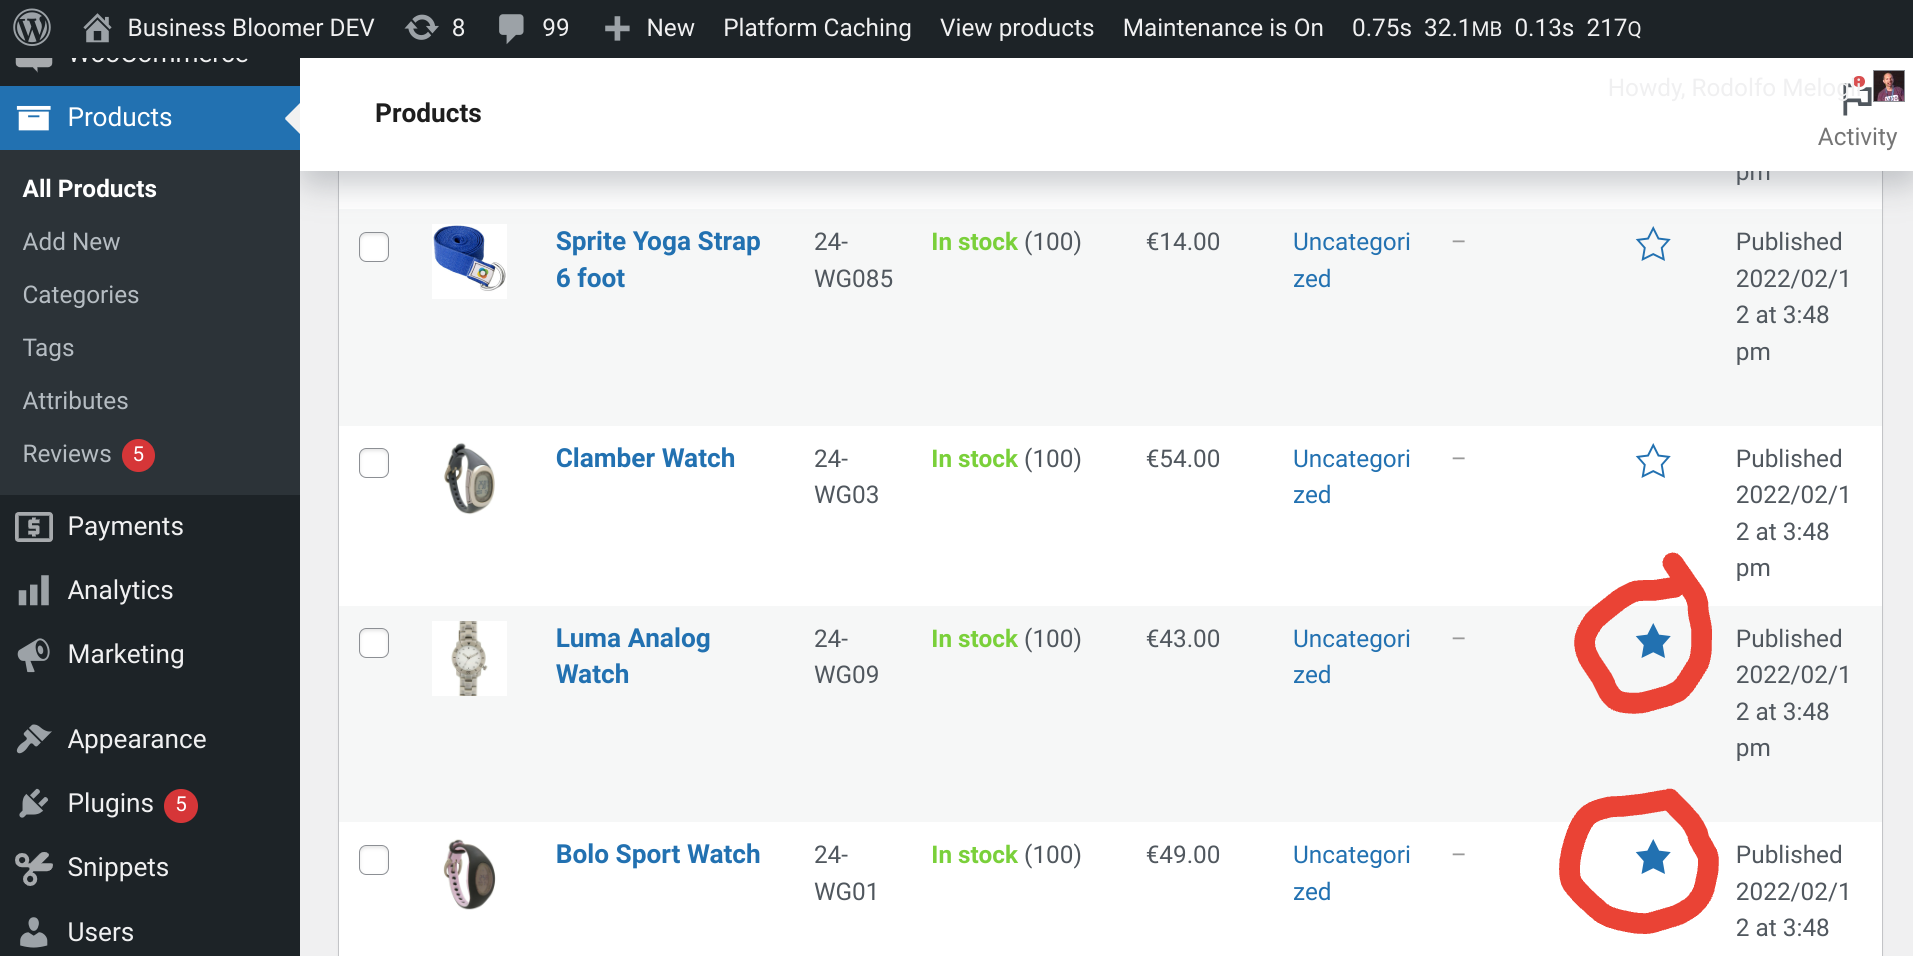
When a variable product stock quantity is managed at variation level, the stock status is either “In stock” or “Out of stock” without any mention of the quantity.
It would be cool, however, and in certain cases only, to show the total stock quantity for all single variations. If variation Red has 3 in stock, variation Blue has 7 in stock and variation Cyan has 10 in stock, I’d like to set the “parent product” stock quantity to 3 + 7 + 10 = 20.
So, how do we do that?
Continue reading WooCommerce: Variable Product “Cumulative” Stock Quantity

As an EU merchant dealing with VAT customers, I often find myself doing manual checks on the VIES VAT number validation website. Thankfully most of my customers are outside the EU so I don’t use the tool often, but still, for a developer this is just a waste of time!
By studying the available options on various online forums, I found a super simple workaround that doesn’t even require signing up for an API.
In fact, you can simply visit an URL and get the response straight away – which means we can access the same URL via PHP, get the response, and possibly return an error on the WooCommerce Checkout page in case the number is not valid.
Read on to find out how I use this validation on this same website.
Continue reading WooCommerce: Super Simple EU Vat Number Validation (VIES)
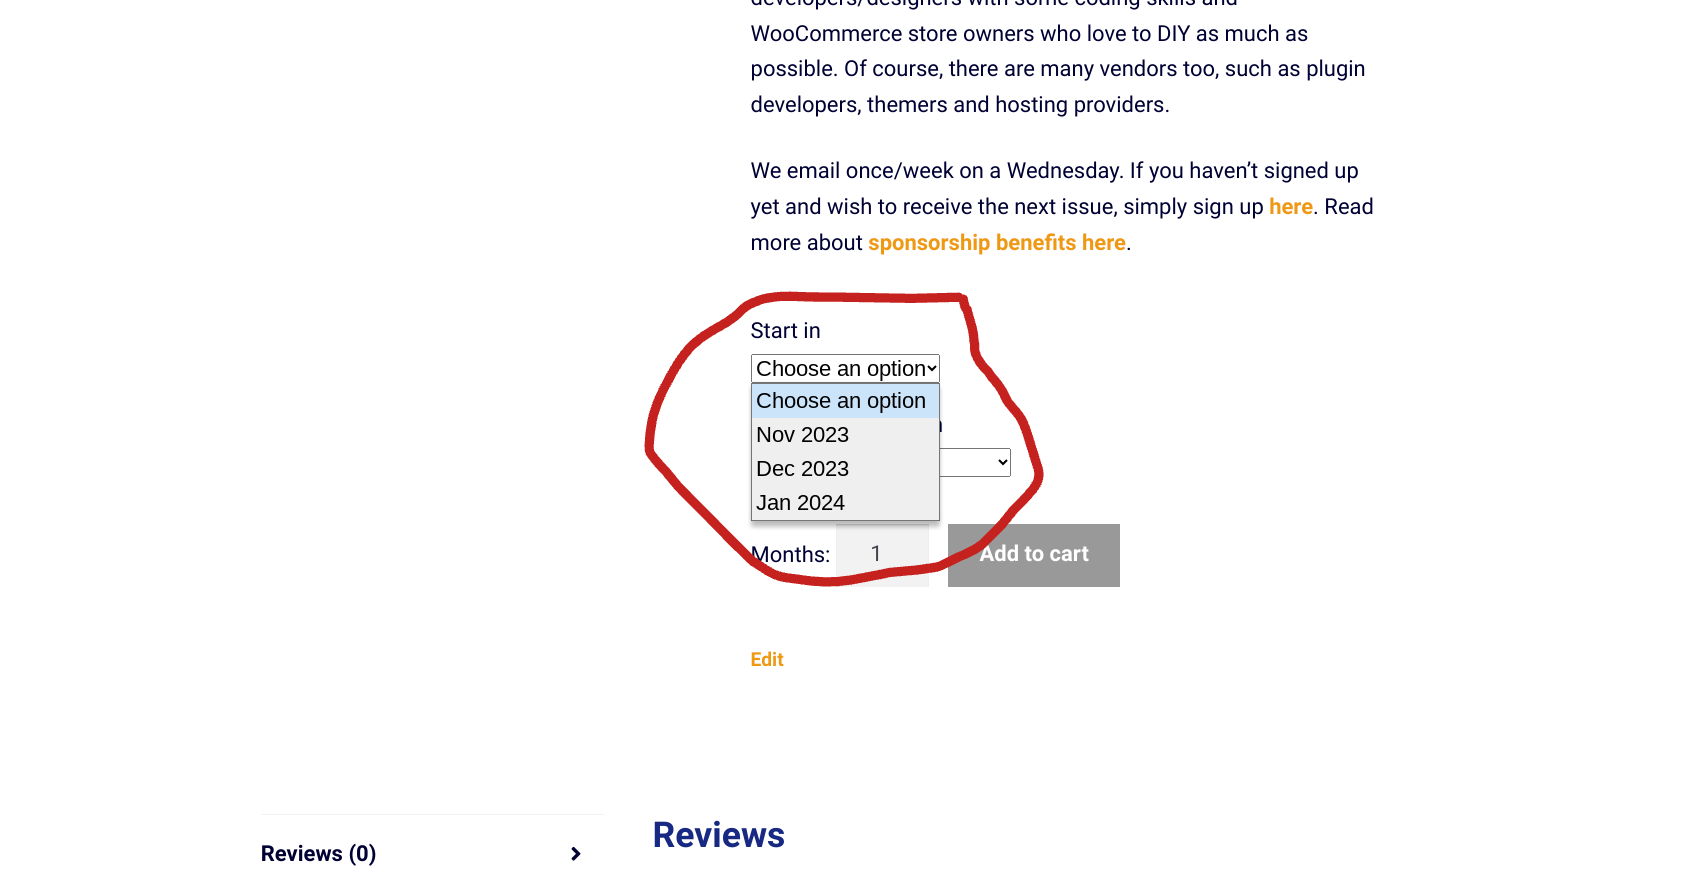
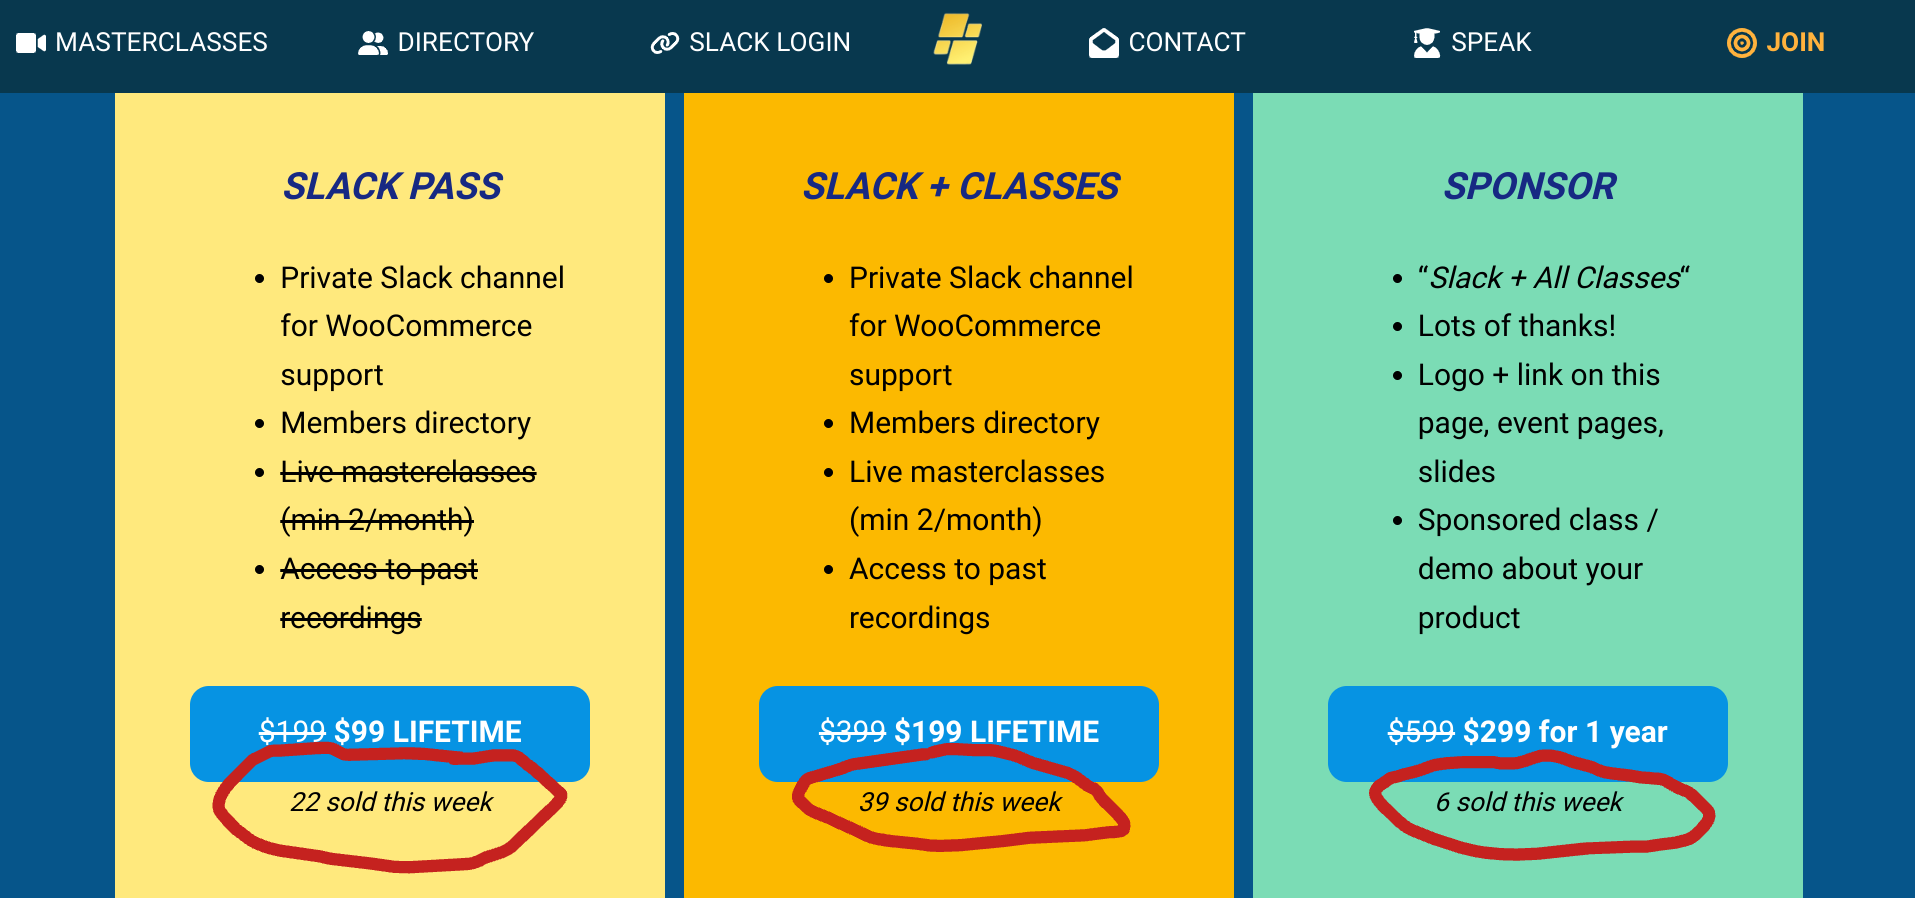
I think the easiest way to explain this customization is with a case study. Go to this variable product page, that I use to sell sponsorship packages on the WooWeekly newsletter: https://www.businessbloomer.com/shop/newsletters/wooweekly-sponsorship/
Now, take a look at the “Start in” attribute dropdown. That’s where a company picks the month for when the sponsorship starts. You will notice that this always displays the next 3 months based on today’s date!
And that’s exactly what I’ve done with the code below. Instead of manually changing the attribute names to “Nov 2023”, “Dec 2023”, “Jan 2024” in October 2023, then changing them again in November, and so on – I’ve come up with a way to rename attribute options dynamically, so that I don’t need to do this every month.
Which means, enjoy, and hope you can make the most of this snippet in case you need it too!
Continue reading WooCommerce: Programmatically Rename Variable Product Attribute Options

If you’ve never run an A/B Test (“Split Test“) on your WooCommerce website, this article is for you. Also, if you want to discover how I run my tests without third party software on this same website, feel free to read on.
So, why A/B Testing a WooCommerce website?
Because your design, development and business decisions should be based on data-driven hypotheses and experimental validation as opposed to “everyone-is-doing-this-thing-so-I-should-do-it-too” theories.
In this article, I’d like to introduce you to the concept of split-testing, go through some statistics formulas, describe my first ever A/B test here on Business Bloomer, and finally share the PHP snippets I use for running quick A/B tests on this same WordPress / WooCommerce website, so that you can learn a thing or two about this very important topic.
Enjoy!
Continue reading WooCommerce: A/B Testing, Statistical Significance Formula, Case Studies
Let's Talk WooCommerce, In Person
I'm bringing together WooCommerce professionals who care about code, business, and connections. No hype, no sales pitches—just smart people meeting in person in Palermo, Italy, April 23–24, 2026.
Join Us at Checkout Summit 2026 →
